Introduction
The Corgi Engine includes a generic weapon system, allowing your characters to equip a weapon (projectile based, melee, or whatever you can think of), switch to another one, and use it. The engine also includes a few examples of weapons you can have a look at, and that you can use as a basis when creating your own.
The CharacterHandleWeapon Ability
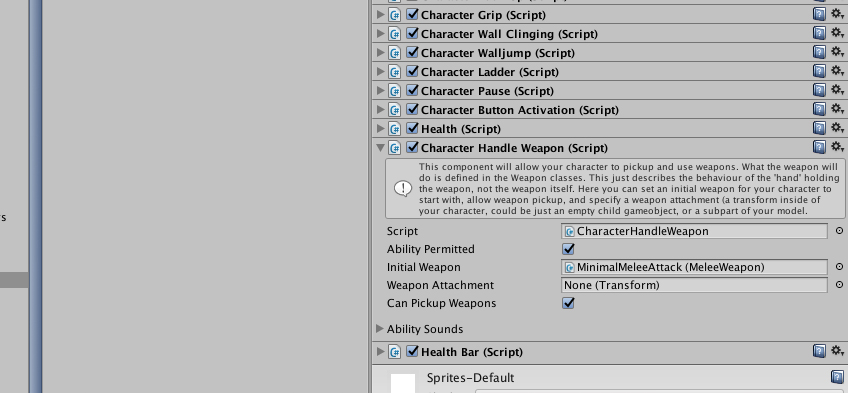
To be able to equip and use a weapon, a Character must have a CharacterHandleWeapon component. From its inspector you’ll be able to optionally select a weapon for your character to start with, define if it can pickup new ones, and specify a Weapon Attachment. This is a transform on your character (or nested inside its prefab) for the weapon to attach to. If you don’t specify one, the weapon will attach to the root level of your prefab.
What the CharacterHandleWeapon component will then do is check for changes on the weapon use button, and if it gets pressed/released, transfer that information to the weapon currently equipped.
The Weapon classes
All weapons in the Corgi Engine derive from the Weapon class. You can of course divert from that, but that’s how all the examples work. The Weapon class is meant to be extended and will define a lot of things common to all or most weapons. Using it as a basis you’ll be able to create everything, from a shotgun to a rocket launcher, but also a katana or a grappling gun. In addition to providing a solid basis for animations, sounds, state management, it allows you to define in your child class what happens when the weapon is used, and build from there. You can look at the ProjectileWeapon and MeleeWeapon classes for examples of how you can create very different weapons from this very same script.
Creating a very simple melee weapon
- in Unity 6000.5.0f1 (or higher), create a new project and import Corgi Engine v10.0 via the Package Manager
- open the MinimalLevel demo scene
- create a new, empty game object, name it MyNewMeleeWeapon, add a MeleeWeapon component to it
- drag this object into a folder in your project to make a prefab out of it, remove it from the scene
- select the Rectangle prefab, drag the MyNewMeleeWeapon prefab into its InitialWeapon slot
- press play, press E to attack (we didn’t setup any animation or visuals, so you’ll have to select your weapon’s damage area to see it activate)
Creating a weapon
To create your own weapon, you can either reuse the ProjectileWeapon or MeleeWeapon scripts as they are, extend them, or create your own Weapon child class. In any case, you’ll then need to create a weapon prefab. To do so, you’ll need a gameobject. Basically you’ll have the choice to have a visible weapon or an invisible one. For example if you look at the BlueRobot enemies, they do have a weapon, but you don’t see it, it’s just an empty gameobject spawning effects and projectiles. The MinimalRocketLauncher on the other hand is visible, and even includes tiny (very minimal) hands. That way when it rotates as the player aims, the weapon is always facing the right direction. So decide on that depending on the kind of visual result you’re looking for.
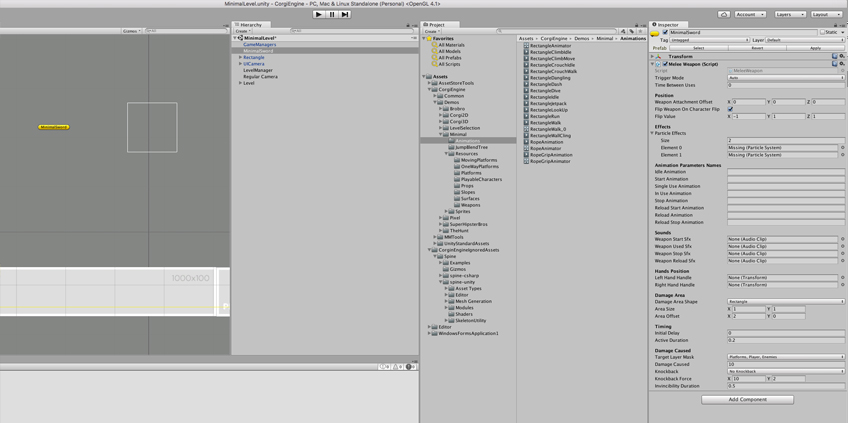
Once you have your sprite, or model, or empty game object, just add your weapon (ProjectileWeapon, MeleeWeapon, or your own) script to it. From its inspector you’ll be able to setup animations, sounds, effects to trigger when firing, and specify how the weapon should flip when the character flips.
Here’s a step by step creation of a Melee Weapon for reference :
- create an empty gameobject
- add a MeleeWeapon component to it
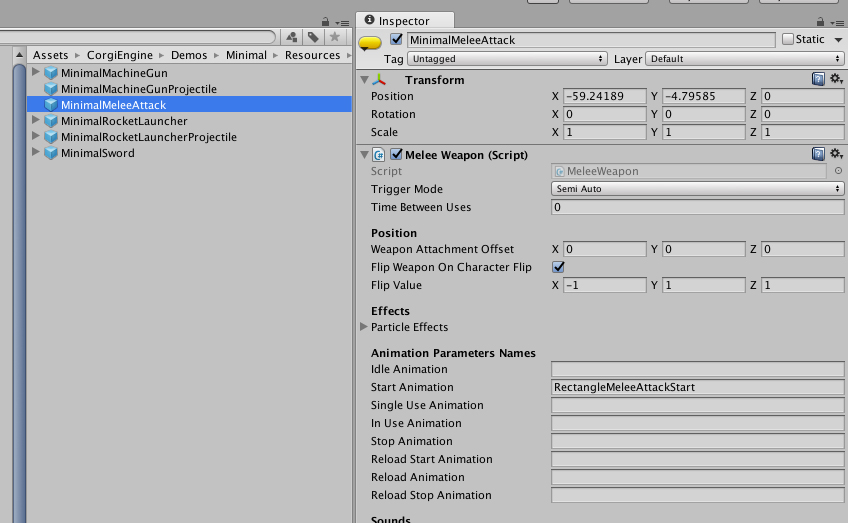
- in the MeleeWeapon inspector, set the following parameters : Trigger Mode to Semi auto, Damage Area Shape to Rectangle, Area Size to {1,1}, Area Offset to {2,0} (so that the damage area will activate in front of our character), Active Duration to 0.2 (it’s a short attack, a punch basically). Then set the Damage Caused Target Layer mask to Platforms and Enemies, and 10 damage.
- rename this gameobject to MeleeAttackWeapon (or whatever you prefer)
- drag this gameobject into your hierarchy to make a prefab out of it
- select your character, and drag that newly created prefab into its InitialWeapon slot (or you can use the ChangeWeapon method via script to equip it)
- that’s it, you now have a working weapon. Press play, then E (by default), and you’ll be throwing punches around and damaging enemies/objects. But so far you’re probably not seeing anything when attacking. Let’s bind an animation to that attack.
- select your character’s animator, drag your attack animation into it if it’s not already the case.
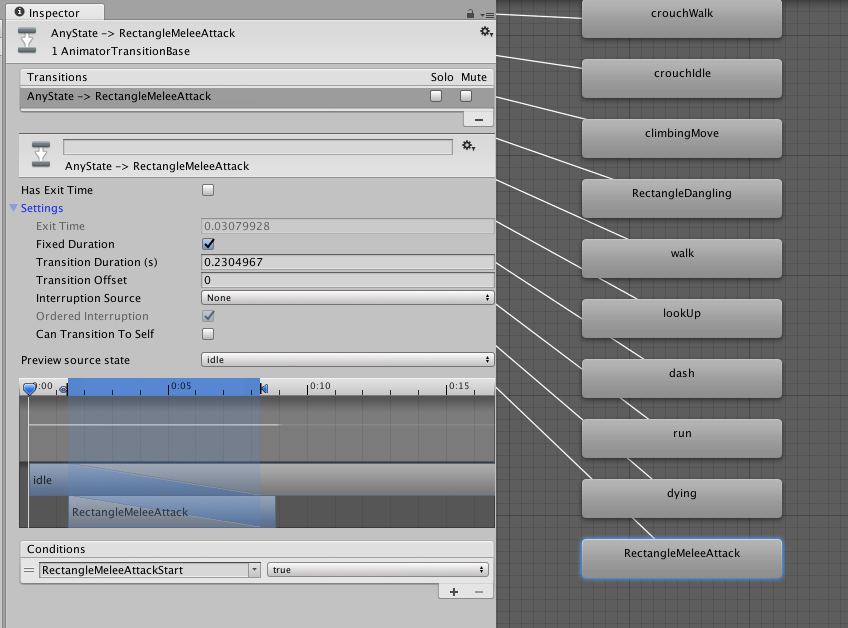
- create a new animation parameter (the little + button at the top right corner of the Parameters panel), in our example we’ll call it “RectangleMeleeAttackStart”

- create a transition to that animation. You’ll probably want it to have the following settings (at least the fixed duration), but feel free to adjust to fit your particular animation.
- go back to your weapon’s inspector, and fill the StartAnimation field with the name of your animation parameter. In our example “RectangleMeleeAttackStart”.
- press play again, attack with your weapon, you now see your character attacking. You can add other animations, for when the attack is in progress, ending, etc.
Projectile Weapons
Projectile weapons will require an Object Pooler component attached to them. You’ll need to add either a SimpleObjectPooler, or a MultipleObjectPooler to your weapon, it won’t shoot anything otherwise. Object poolers are a way to recycle projectiles as they’re fired, that way you don’t instantiate/destroy objects as you go, which is much better for your game’s performance. Simple object poolers will allow you to shoot one type of projectile only (which is just fine for most weapons), but if you want to get fancy and have it shoot different type of stuff, go for a MultipleObjectPooler. In your object pooler’s inspector, drag the object you want to shoot in the GameObjectToPool field, define the pool size (the amount of items the game will store and reuse, how much that is really depends on your game, the level’s size, etc. Basically the idea is that you want your pool to never be used entirely, but not be too large either). Finally you can decide whether the pool can expand to accomodate for edge cases where all the pool’s been used but not recycled yet.
Additionally, you can define from the inspector the spread and amount of projectiles per shot. The spread is defined by a maximum angle (on all 3 axis), and can be random or not. If not random, you can combine it with multiple projectiles per shot to create patterns.
You can also have your Projectile Weapons use BurstMode, usually for semi-auto weapons, to have them shoot a series of projectiles with a single press. If you go with burst mode, you’ll need to define a burst length (how many bullets a burst should be made of), and a burst time between shots (how many seconds should pass between two shots in a burst).
Creating a very simple projectile weapon
- in Unity 6000.5.0f1 (or higher), create a new project and import Corgi Engine v10.0 via the Package Manager
- open the MinimalLevel demo scene
- create an empty game object, name it MyTestProjectileWeapon, position it at 0,0,0
- add a ProjectileWeapon component to it
- add a MMSimpleObjectPooler to it , set its GameObjectToPool to the MinimalMachineGunBullet prefab
- optionally add a WeaponAim component to it
- drag the MyTestProjectileWeapon in a folder in your project to make a prefab of it, remove it from your scene
- select the Rectangle prefab, set the MyTestProjectileWeapon prefab as its InitialWeapon
- press play in the editor, then E to shoot
Projectiles
Projectile Weapons usually shoot projectiles (I know). The engine comes with two ready-to-use classes for that. The aptly named Projectile class will handle most common uses, from bullets to rockets. It’ll allow you to create projectiles that move in one direction (affected or not by the direction of the weapon), at a certain speed and acceleration. The MinimalMachineGunBullet prefab is a good example of it.
The other class you can use is the Thrown Object class. Useful for grenades, knives, or anything you want gravity to affect. To these, the weapon will apply an initial force and let gravity handle the rest.
To most projectiles you’ll want to add a DamageOnTouch component, so they hurt their target, and potentially a Health component if you want them to be destroyable before they hit. Important note : a DamageOnTouch requires its associated collider to be marked as trigger. It will make that change on initialization if that’s not already the case.
The engine also lets you create Bouncy Projectiles, that will bounce on the selected surface(s). Creating a Bouncy Projectile is done exactly like a regular projectile, except you’ll use a BouncyProjectile component in lieu of the regular Projectile one. On it you’ll be able to define the layer(s) the projectile should bounce on, how many bounces are allowed (random value between a min and max), and a speed modifier (also optionally random). You can also define a MMFeedbacks to play when a bounce happens.
Hitscan Weapons
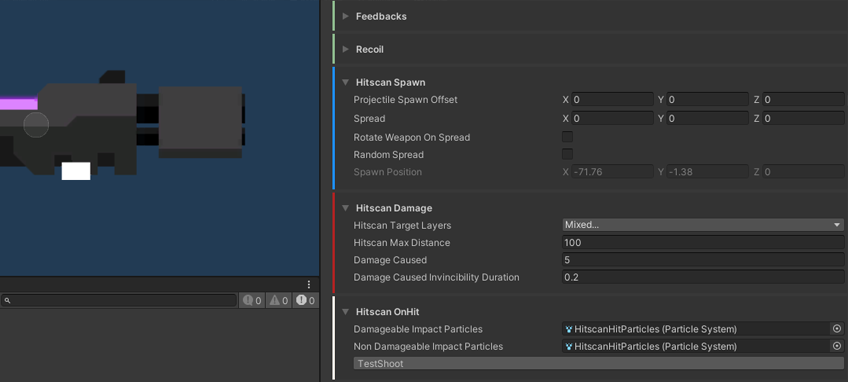
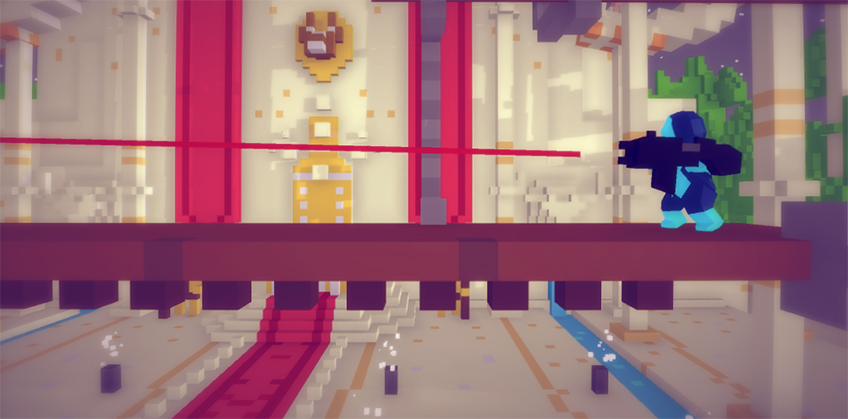
Distance based weapons like the projectile ones, hitscan weapons don’t throw anything, instead they apply damage instantly, whatever the distance. They’re typically used for railguns or beam weapons, but you could use them for rifles as well, or anything you want. You can look at the MinimalHitscanGun prefab for an example of it (it’s pickable in the FeaturesWeapons demo scene). From its dedicated sections in the inspector, you’ll be able to define what layer the weapon should apply damage to, the distance after which it doesn’t hit anymore, the amount of damage it causes, and particle systems to instantiate (at the correct position) when hitting damageables and non-damageables.
Timing
Timing is essential when creating weapons, as you’ll want to sync your weapon’s component to its animation perfectly. All weapons come with two variables you can tweak directly from the inspector : DelayBeforeUse (the time between the input registration and the actual WeaponUse - the shot, axe sling, etc), and TimeBetweenUses (the time that needs to pass before you can have another WeaponUse (whether it’s in auto, or via repeated presses, etc). The weapon just won’t “shoot” during that time).
Additionally, the melee weapons have two more variables you can play with : InitialDelay (the delay between the WeaponUse and the activation of the damage area) and ActiveDuration (the time during which the damage area will stay active). These 2 last parameters are very specific to damage areas, and of course you’ll want to sync these values with your DelayBeforeUse / TimeBetweenUses to prevent conflicts.
You can also set your weapons to prevent movement while attacking, making sure your character won’t run around in the middle of its attack.
Feedbacks
The engine will let you bind MMFeedbacks to many of its states : on start, when it’s used, on stop, on reload, on reload needed, on hit, on miss, on hit damageable, on hit non damageable, on kill. It’s usually recommended to create a child object on the Weapon, one per feedback, and to add a MMFeedbacks component to it. You can then drag and drop it into the slot of your choice in the Weapon’s inspector’s feedback section.
Setting up a feedback on a melee weapon
- in this example we want to associate a feedback to the action of hitting a wall (or any non damageable element) with a weapon
- in Unity 6000.5.0f1 (or higher), create a new project and import Corgi Engine v10.0 via the Package Manager
- open RetroAI
- edit the RetroComboSword prefab
- add an empty child, name it WeaponHitWallsFeedback, add a MMF_Player component to it
- add a Debug>Log feedback to it, set its DebugMessage to “test”
- on the 1st MeleeWeapon of the RetroComboSword, drag the WeaponHitWallsFeedback into the WeaponOnHitNonDamageableFeedback slot
- save the prefab
- press play, grab the sword, hit the wall on the left (with E)
Recoil
The engine lets you define recoil on certain weapon events : Use, Hit Damageable, Hit Non Damageable, Miss, Kill. Not all categories of weapons will offer all of these options (a projectile weapon for example won’t offer Miss, as it could take quite a while for a projectile to “miss”, but a melee weapon or hitscan weapon will. For each of these, you can have your weapon add or set a force to your Character’s controller, of the specified force (separate forces whether the Character is grounded or not), an optional delay, and an associated feedback.
Combo Weapons
The engine comes with built-in support for combo weapons, and they’re super easy to create. You can look at the RetroComboSword prefab for an example of how they work. To create one, simply add multiple Weapon components (MeleeWeapons, ProjectileWeapons, or your own extensions of Weapons) to an object, and set each of them up like you would any other weapon. Then add a ComboWeapon component. In it, you just have to define whether or not the combo can be dropped, and after what delay (in seconds). A droppable combo means that if you wait too long (more than the specified delay) between two attacks, the next attack will be the first attack again, otherwise it’ll move to the next in line.
Charge Weapons
The Corgi Engine also lets you easily build charge weapons, similar to Megaman’s MegaBuster, where pressing the shoot button “charges” the weapon and sequentially transitions to stronger attacks. You can look at the MinimalChargeWeapon for a very similar example of that. Creating a Charge Weapon is fairly similar to creating a Combo Weapon, in that it’s basically a chaining of multiple Weapons. But where combo weapons will all trigger in sequence, the ChargeWeapon will move a pointer along in a list of weapons, and trigger it when input gets released. A ChargeWeapon exposes a list of weapons in the charge sequence, and for each of them, you can set a charge duration, whether or not to trigger that weapon if the charge gets interrupted, whether or not to flip it, and feedbacks on charge start, charge interrupted and charge complete. These should be enough to get very creative and assemble all sorts of cool charge sequences!
Weapon Laser Sight
You can add a WeaponLaserSight to your weapon. It’s of course more suited for a projectile weapon but there are no restrictions. What it’ll do is that it’ll cast a laser in front of the weapon, like a laser sight would. You can set a collision mask so that the laser stops when meeting a wall or platform. From the inspector you can also customize the appearance of the laser.
Weapon Aim
Adding a WeaponAim component to your weapon will allow you to control its orientation, allowing your character to shoot up, down, etc. You’ll need your camera to be orthographic for this. From its inspector you’ll be able to define its control mode :
- Off : no weapon aim
- PrimaryMovement : the weapon will aim in whatever direction you’re moving your movement stick/keys to.
- SecondaryMovement : the weapon will aim in the direction you point your secondary movement input to. That’s the right stick on an xbox pad by default, for example.
- Mouse : the weapon will point in the direction of the mouse pointer
- Script : bypasses input and lets you feed a direction to the weapon, using the SetCurrentAim method. You can see an example of that in action in the WeaponAutoAim class.
You can also define the Rotation Mode :
- Free : full 360° rotation
- Strict 4 directions : up, down, left, right
- Strict 8 directions : up, down, left, right, and the diagonals (up left, down right, etc)
Finally you can define a maximum and minimum angle to constrain movement to allow only up shots for example, or prevent the character to shoot in its back.
The WeaponAim component also allows you to display a Reticle on screen for your weapon. You’ll need to specify a gameobject prefab for it (there’s one included in the asset, called TheHuntReticle, but you can use your own of course). You can set the distance from the character the reticle should be at, or if it should follow the mouse, if it should rotate as you aim your weapon, and whether or not the mouse pointer should be hidden.
As a general, you’ll want to make sure your WeaponAim component is above your Weapon component in the inspector, to avoid race conditions between both components that could lead to projectiles firing in the wrong direction for a frame sometimes.
Auto Aim
In your game, maybe you’d like your Character to auto aim at enemies or targets, without the need for player input. Since v6.6, the engine empowers you to do so. To enable auto aim on a weapon, simply add a WeaponAutoAim component to it. From its inspector you’ll be able to define what layer(s) the weapon should consider as targets, the scan radius, frequency, etc. You can see this component in action on the MinimalHitscanGun, available for pickup in the FeaturesWeapons demo scene.
Aim Marker
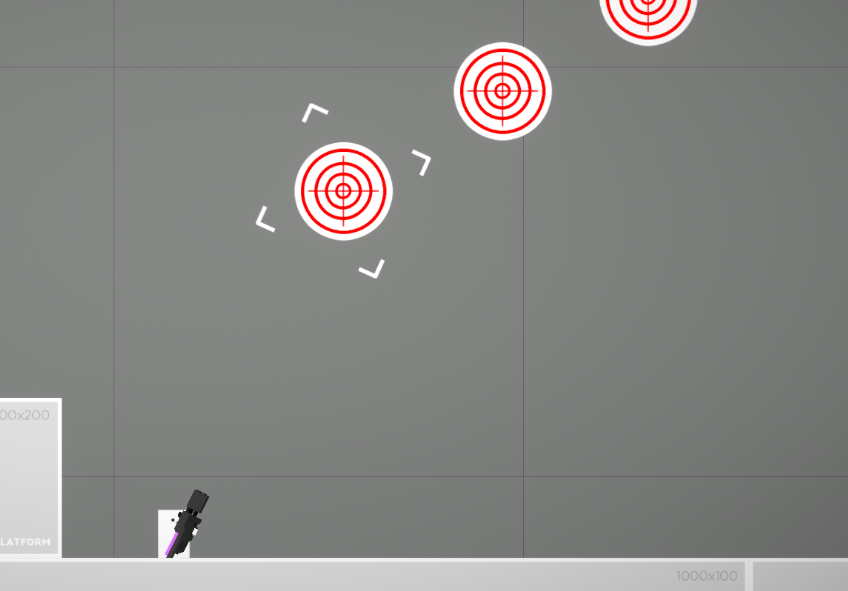
When dealing with auto aim, it may be that you’ll want your user to know what they’re aiming at. The Aim Marker class is here for that. To create an aim marker, simply add an AimMarker component to an object. It can be any type of object, a sprite, a model, anything you want. From the AimMarker component you’ll be able to determine whether the aim marker should instantly move from target to target, or if it should interpolate its position, you can also add a position offset (for an arrow above the target, for example), as well as add a delay. The component also comes with MMFeedbacks slots for when a new target is found, when a new target gets assigned, and when there are no more targets. Once that object is created, make sure you bind it to the AimMarkerPrefab slot in your WeaponAutoAim component.
You can find an example of an AimMarker showcasing all these features in the FeaturesWeapons demo scene, on the HitscanGun weapon.
Ammo
With the introduction of the InventoryEngine in v4.0, the engine now supports ammo and the possibility to create ammo based weapons. There are two types of ammo based weapons you can create : inventory based, and regular ones.
Inventory based weapons will require your character to have an Inventory attached to it (via the CharacterInventory ability), while regular ammo based weapons will just consume infinite ammo, but both will allow you to define a magazine size, reload or not, etc.
All these settings can be set on the weapon’s inspector. There you’ll be able to define the magazine size, whether the weapon auto reloads when the magazine is empty, or if the player needs to press the reload key, how long the reload should take (in seconds), as well as how much of that ammo each shot consumes.
Checking the “Magazine based” checkbox will tell the weapon that it should take its ammo from the character’s inventory. To do so, you’ll also need another component on your weapon, WeaponAmmo. There you’ll be able to specify the name of the ammo the system should look for in the inventory (“Bullets” for example), what the inventory’s name is (usually MainInventory but you can pick any name you prefer as long as it’s set that way on your inventory), the maximum ammo the weapon’s ammo indicator should go for, and whether or not the weapon should load itself with ammo from the inventory when equipped.
Weapons and Inventory
If your character is using an inventory, the Player can now switch weapons (cycling through all the weapons available in the inventory) using an input shortcut. By default this is bound to LB on an xbox pad, or t on a keyboard.
Additionally, if your character has a Weapon Inventory, and if that inventory contains a weapon when starting a level, this weapon will be automatically equipped.
Starting a level with weapons pre-added to an inventory
- in Unity 6000.5.0f1 (or higher), create a new project and import Corgi Engine v10.0 via the Package Manager
- open the FeaturesWeapons demo scene
- select the RectangleWithInventory prefab in your project view
- under CharacterInventory, set the AutoAddItemsMainInventory array size to 1, drag the InventoryMachineGun asset into the Item slot, set quantity to 1
- Drag the InventoryGrenadeLauncher asset into the AutoEquipWeapon slot
- press play, you now start with the grenade launcher equipped. Press T to switch to the machine gun, press T again to revert to the grenade launcher
Weapons IK
From the Weapon’s inspector you can define left and right hand attachments to use with Unity’s built-in animation IK system. This will attach the hands of your character to specific points of your weapon, detach them when you unequip the weapon, and allow your character to move and aim naturally as you move your weapon. The Soldiers demo characters in TheHunt are all setup like that if you want a ready to use example.
Aside from creating your avatar properly (Unity’s got great documentation about that), the only thing you’ll need to ease up the process is the WeaponIK class, ideally set at the same level as your avatar’s animator (that’d be the “Red” node in the Soldier3DRed prefab for reference). This class allows for a 3D character to grab its current weapon’s handles, and look wherever it’s aiming. There’s a bit of setup involved. You need to have a CharacterHandleWeapon component on your character, it needs an animator with IKPass active (this is set in the Layers tab of the animator) and the animator’s avatar MUST be set as humanoid.
Animation Parameters
Each weapon comes with a number of animation parameters you can define. While in the rest of the engine, animation parameters names are decided for you (Jumping, Idle, etc…), here you can set your own (as the engine can’t guess what weapons you’ll create). Here’s a list of the animation parameters you can set :
- EquippedAnimationParameter : the name of the parameter to send to true as long as this weapon is equipped, used or not.
- IdleAnimationParameter : the name of the weapon’s idle animation parameter : this will be true all the time except when the weapon is being used
- StartAnimationParameter : the name of the weapon’s start animation parameter : true at the frame where the weapon starts being used
- DelayBeforeUseAnimationParameter : the name of the weapon’s delay before use animation parameter : true when the weapon has been activated but hasn’t been used yet
- SingleUseAnimationParameter : the name of the weapon’s single use animation parameter : true at each frame the weapon activates (shoots)
- UseAnimationParameter : the name of the weapon’s in use animation parameter : true at each frame the weapon has started firing but hasn’t stopped yet
- DelayBetweenUsesAnimationParameter : the name of the weapon’s delay between each use animation parameter : true when the weapon is in use
- StopAnimationParameter : the name of the weapon stop animation parameter : true after a shot and before the next one or the weapon’s stop
- ReloadStartAnimationParameter : the name of the weapon reload start animation parameter
- ReloadAnimationParameter : the name of the weapon reload animation parameter
- ReloadStopAnimationParameter : the name of the weapon reload end animation parameter
- WeaponAngleAnimationParameter : the name of the weapon’s angle animation parameter
- WeaponAngleRelativeAnimationParameter : the name of the weapon’s angle animation parameter, adjusted so it’s always relative to the direction the character is currently facing
These animation parameters will be sent to your character, and also to any additional animator you bind to your weapon via its inspector. From there, you can use them in your transition conditions to point at (for example) different sets of animations based on what weapon is currently equipped, or to trigger a special attack animation.
Weapon examples
The engine comes with a bunch of demo weapons you can build on (or reuse if you like them). Most of them are available as regular weapons and as inventory based ones.
- Machine Gun : shoots bullets in automatic mode
- Shotgun : shoots three bullets in semi automatic mode, and you’ll need to reload it after 2 shots
- Melee Attack : an example of a sword/melee attack
- Rocket Launcher : shoots a slow(ish) rocket
- Grenade Launcher : shoots grenades that bounce on walls and stuff and explode after a while
Ammo Display
AmmoDisplay is a component you can add to a GUI rect to have it display a progress bar and text showing how much ammo you’ve got left in your magazine and inventory. Just add it to an empty GUI object, and in its inspector you’ll need to bind it to a ForegroundBar and a Text object, and specify for what player you want to display that info (usually Player1).