Introduction
Input is at the heart of every game. The Corgi Engine is no exception. It currently supports mobile controls (iOS, Android…), keyboard, gamepad (setup for windows xbox pad but feel free to rebind the keys for other controllers), and mouse.
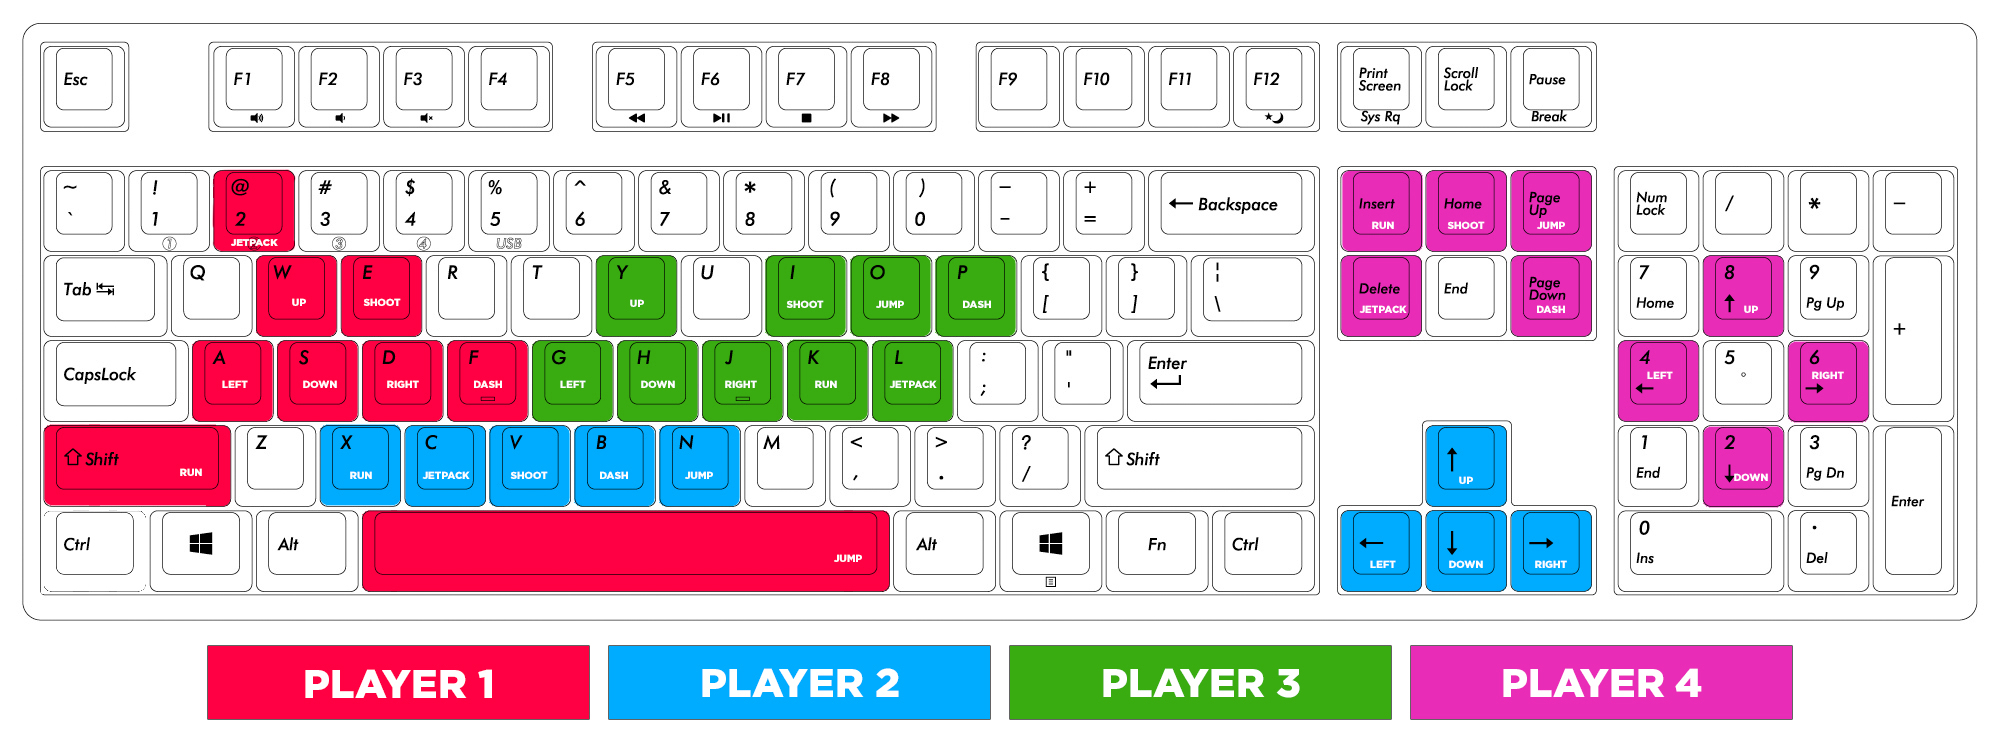
Default Input
By default the keyboard layout has been created to support 4 simultaneous players. Now that may not be very comfortable for a single player game, feel free to remap the buttons to suit your needs (see the following section). In any case, here is the default layout (click on the image to expand) :
Input Settings - How to change key bindings?
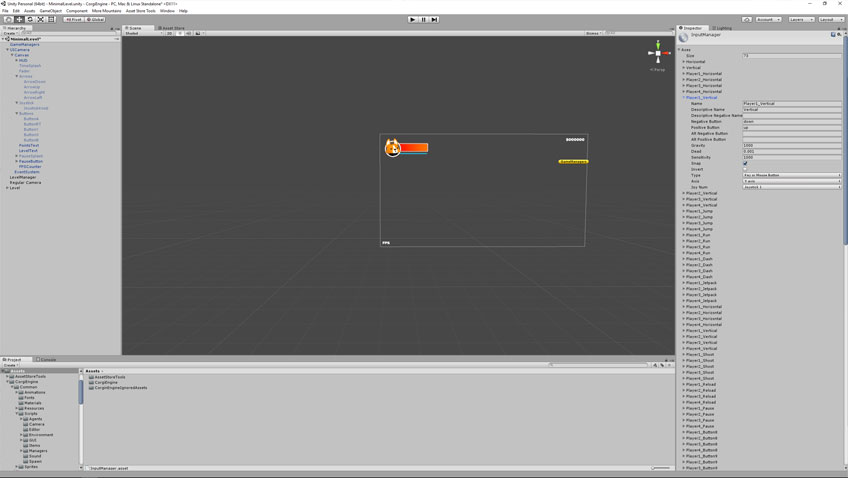
For keyboard and gamepad (and to a lesser extent mouse), key bindings are defined, like in any good Unity project, via the native Input settings. You can access these via the top menu Edit > Project Settings > Input. This should open a quite large list of “axis”. If you’ve never seen this panel before, maybe have a look at the official documentation first.
Now that list is pretty long. That list has been filled to support 4 players (you could add more if you want), and proposes one key configuration. Feel free to edit each of these to rebind the keys to your preference.
Input Manager and GUI
To move your character on screen, you usually use input, whether it’s via touch on a screen or by pressing mechanical keys. To handle input detection and pass it to your Character, the Corgi Engine uses an Input Manager. Most levels of the Corgi Engine have a UI Camera in them. This UI Camera prefab also has, nested inside it, a bunch of mobile controls used to control the player when playing on mobile. For that reason, and to make binding easier, you’ll find the InputManager at the top level of the UICamera prefab. You can decide to place it on its own game object if you prefer.
The Input Manager is quite a long class. If you take a look at it, you’ll see it’s not too complex, just very verbose. It has a lot of methods that you’ll be able to bind to your mobile controls, and manages a small state machine for each of the registered buttons. Buttons are IMButtons (short for InputManager Button), a unified interface allowing you to either detect input on keyboard/gamepad or bind mobile buttons to them. This class will keep track of its state (pressed for the first time, being pressed, released or idle), and will let you poll it to know the time at which a button was pressed or released last.
From its inspector you’ll be able to specify the PlayerID (see the next section for more on that), whether or not you want to use mobile detection or force mobile controls. You can also decide whether you prefer virtual arrows/dpad or virtual joystick. And finally you can set smooth movement on or off (should a press on left be instant or quickly lerped?), and the horizontal and vertical thresholds.
Player ID
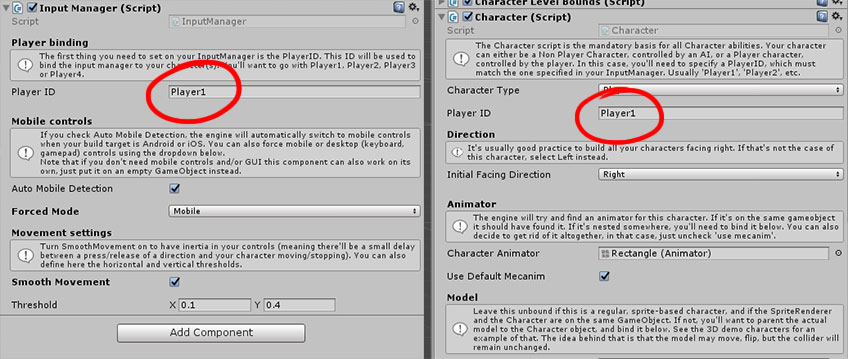
One thing here that is really important to understand is the PlayerID notion. The engine is able to send input from the InputManager to playable characters in the scene (objects with a Character component whose type is set to Player). Each InputManager has a PlayerID attribute, and it’ll send its information to all characters whose own PlayerID attribute match it. So there are a few ways this can work :
- The most common way is to simply let the engine handle this. Add an InputManager to your scene, set its PlayerID to “Player1”. Then in the LevelManager, when you add your character, have the “Auto attribute player IDs” checkbox checked, and it’ll automatically give the playable character the “Player1” ID. If you are in a multiplayer level use “Player2”, “Player3” and “Player4”. You can add your own of course, but these are the default ones.
- You can also set the PlayerID on the prefab. For example you could have a Dog character, whose PlayerID is “JoeTheDog” (why not?). If you add an InputManager to your scene and want it to target that Dog character, set its own PlayerID parameter to “JoeTheDog”. Press play and you should be able to control your Dog character. That method is great if for some reason you don’t want to use the Level Manager and want to instantly move a prefab in the scene.
I use that second method a lot when tweaking a character. Let’s say I want to change the Jump behaviour of my character. I’ll just copy my character’s prefab, put that copy in the scene, set its PlayerID to Player1. Then in the LevelManager I put the original prefab as the Player Prefab. I press play and I’m now controlling two characters with the same input. I can then change the jump settings on one of them (or even add a new Jump script in place of the old one), and play test both very fast to see if my changes are improving the gameplay.
How does platform detection work?
From the InputManager’s inspector you can turn auto mobile detection on or off.
If you unfold the UICamera prefab, you’ll see it contains quite a lot of stuff, and notably Arrows, Joystick and Buttons canvas groups. They’re disabled by default to allow for simpler level editions but you can turn them on if you prefer, or to tweak them. These are then bound to the GUIManager component (among other stuff). Mobile detection works in a very simple way : if you’re targeting a mobile platform (iOS or Android), it’ll show the controls when you press play. If you’re targeting another platform, it’ll hide and disable them. You can also force one mode or the other from the inspector.
Virtual Arrows, Joysticks and Buttons

The asset comes packed with a fully functional arrow D-pad, a joystick and some buttons, but of course you can remix all that, add buttons, add joysticks, etc. to match your own gameplay. You’ll find a demo of all the ready-to-use mobile input building blocks included in the engine in the MMControlsTestScene demo scene.
Mobile arrows are very simple, you just need an MMTouchAxis component on a Rect+CanvasGroup object. Then in its inspector you need to set the axis value (usually -1 for left/down or 1 for right/up). Then you need to bind it to your InputManager, simply on the AxisPressed event. To do that, just drag your InputManager (in most cases the UICamera prefab in your scene) onto the little box below “runtime only”, and then select the appropriate method (SetVerticalMovement, SetHorizontalMovement, or their secondary counterparts).
Mobile joysticks are even easier to setup. Just add a MMTouchJoystick component to a Rect+CanvasGroup object, define which axis are enabled (you may want an horizontal only stick for example), the max range (how far the knob can move from its base), and then you bind your input manager to it. Note that you’ll also need to specify a target camera (usually your UICamera).
Repositionable joysticks : similar in aspect to the regular joysticks, these ones reposition within a bigger zone as you lift your thumb and put it back on the screen again.
Buttons work in the same way too, but for them you’ll be able to specify three different events : button down (when it’s pressed for the first time), button up (when it’s released), and button pressed (when it’s being pressed at a certain frame). This will allow you in your Character Abilities (for example) to call certain methods when a button gets released for example. You don’t have to bind all events if you’re not using all of them.
Swipe zones : let you drag your thumb across their surface, and trigger swipe events, complete with angle, direction, length, etc.
Adding a repositionable mobile joystick in place of the regular one
- in Unity 6000.5.0f1 (or higher), create a new project and import Corgi Engine v10.0 via the Package Manager
- open the demo located at CorgiEngine/ThirdParty/MoreMountains/MMTools/Tools/MMControls/Demo, select its JoystickRepositionable node, copy it
- open the MinimalLevel demo scene
- open its UICamera prefab
- paste the repositionable joystick under Canvas and next to the existing Joystick node
- position it at 400,-1000
- disable it
- in its MMTouchRepositionableJoystick’s inspector, drag the UICamera node into its JoystickValue slot. Select the InputManager.SetMovement method (the one at the top, under DynamicVector2, NOT the static one)
- drag the UICamera into its TargetCamera slot
- select the UICamera’s top level, and drag the JoystickRepositionable node into the GUIManager’s inspector’s Joystick slot
- save your prefab, exit prefab mode
- select your UICamera, and on the InputManager inspector, set ForcedMode to Mobile, and MovementControl to Joystick
- press play, enjoy your repositionable joystick
Disabling input
If you wish to disable input, you can do it in two main ways :
- At the InputManager level, by setting InputDetectionActive to false (either via script or via its inspector). This will prevent all input from being read via the InputManager.
- At the ability level, by setting AbilityPermitted to false
Nice Touch
The Corgi Engine includes another of More Mountains’ assets : Nice Touch. Don’t buy it if you already own the Corgi Engine! I created Nice Touch to provide a simple and fast input solution. It handles keyboard, gamepad, mouse, and touch input. There are a lot of other input solutions out there. For a while the Corgi Engine used Unity’s standard assets’ CrossPlatformInput. Nice Touch/MMControls were created to give a simpler alternative, faster to setup, without unnecessary settings. Feel free to not use these and replace them with your own.
You’ll find these scripts into MMTools/MMControls. That same folder also includes a test scene : MMControlsTestScene. You’ll want to keep that folder in your game.
Automating input
If you’d rather have less input and more automation, that’s also possible. The Character Auto Movement is an example of this. This ability will make your character move automatically, without having to touch the left or right inputs, ala Super Mario Run. You’ll find an example of this in action in the MinimalAutoMovement demo scene. Note that you can use AutoMovementControlZones to define direction changes, state change, stop movement, etc. Some features, like push or gravity zones won’t work with that ability, but most will work just fine.
Using the new input system
Unity released a new input system in 2017, and despite still not being fully documented or stable, it’s been marked as “verified” recently. If despite all the risks associated to using it you want to use it in your production, the Corgi Engine comes with two examples of it in use. You’ll find them under CorgiEngine/Common/ScriptsInputSystem, and of course they require that you install and setup the Input System package.
You’ll notice there that the InputManager gets replaced by an InputSystemManager, or InputSystemManagerEventsBased, depending on what demo you look at (the event version is best suited for multiplayer). In both cases you’ll find the InputSystemManager under the camera rig. Both rely on another class, CorgiEngineInputActions, which is just the regular auto generated output of the “new” system. Aside from the specific API calls of that system, and the use of that class, there’s nothing specific to it, it works like the regular version. It’s recommended that you have a good understanding of that system to pick this option, like the rest of that system, it’s less intuitive than the classic option.
Using the new Input System in other scenes
- in Unity 6000.5.0f1 (or higher), create a new project and import Corgi Engine v10.0 via the Package Manager
- from the package manager, install the latest version of the Input System package
- open the MinimalLevel_InputSystem demo scene
- copy the UICamera_InputSystem node
- open the Lava demo scene
- paste your node in the hierarchy panel
- remove the UICamera node
- press play, you’re now using the new input system
Adding new input entries to the engine
Let’s say you want to create a new ability for your character, to have it bark when you press a key, and you’d like it to use a new input binding. There are two main ways to go about it:
- the easiest one is to simply use Unity’s native APIs (see Unity’s docs for that, it’s entirely unrelated to the engine, and you can use any input API you want, the InputManager, the InputSystem, Rewired, etc). this doesn’t require any CE knowledge, and is covered in details in Unity’s docs
- the more complex way would be to extend the CE input manager of your choice, and declare a new button there the way the others are declared
Below are four examples of how to tackle these. The first two target Unity’s input APIs directly (respectively the old and new one), while the last two show how to extend the input manager (likewise, both the old and new).
Here are steps to handle this scenario using the first and easiest option:
Creating a new input entry by polling Unity's API directly
- in Unity 6000.5.0f1 (or higher), create a new project and import Corgi Engine v10.0 via the Package Manager, open the MinimalLevel demo scene
- add the CharacterBark ability below to your project
- edit the Rectangle character, add the CharacterBark ability to it, enter play mode, press B to bark
CharacterBark:
using MoreMountains.CorgiEngine;
using MoreMountains.Tools;
using UnityEngine;

public class CharacterBark : CharacterAbility
{
    protected override void HandleInput()
    {
        base.HandleInput();
        if (Input.GetKeyDown(KeyCode.B))
        {
            MMDebug.DebugLogTime("Bark.");
        }
    }
}
Here are steps to do the same thing, but this time targeting the InputSystem API:
Creating a new input entry by targeting the InputSystem API
- in Unity 6000.5.0f1 (or higher), create a new project and import Corgi Engine v10.0 via the Package Manager + input system
- add the CharacterBark ability below to your project
- edit the Rectangle character, add the CharacterBark ability to it, enter play mode, press B to bark
CharacterBark:
using MoreMountains.CorgiEngine;
using MoreMountains.Tools;
using UnityEngine.InputSystem;

public class CharacterBark : CharacterAbility
{
    protected override void HandleInput()
    {
        base.HandleInput();
        if (Keyboard.current.bKey.wasPressedThisFrame)
        {
            MMDebug.DebugLogTime("Bark.");
        }
    }
}
Now here are steps to do the same thing, but this time using Unity’s InputManager, and extending the Corgi Engine’s InputManager:
Creating a new input entry by extending the InputManager
- in Unity 6000.5.0f1 (or higher), create a new project and import Corgi Engine v10.0 via the Package Manager, open the MinimalLevel demo scene
- add the CharacterBark ability and MyOwnInputManager below to your project
- go to Edit > Project Settings, duplicate the Player1_Jump entry, rename it Player1_Bark, set its PositiveButton to b
- remove the InputManager on the UICamera in the scene, replace it with MyOwnInputManager
- edit the Rectangle character, add the CharacterBark ability to it, enter play mode, press B to bark
CharacterBark:
using MoreMountains.CorgiEngine;
using MoreMountains.Tools;

public class CharacterBark : CharacterAbility
{
    protected override void HandleInput()
    {
        base.HandleInput();
        if ((_inputManager as MyOwnInputManager).BarkButton.State.CurrentState == MMInput.ButtonStates.ButtonDown)
        {
            MMDebug.DebugLogTime("Bark.");
        }
    }
}
MyOwnInputManager:
using MoreMountains.CorgiEngine;
using MoreMountains.Tools;

public class MyOwnInputManager : InputManager
{
	public MMInput.IMButton BarkButton { get; protected set; }

	protected override void InitializeButtons()
	{
		base.InitializeButtons();
		ButtonList.Add(BarkButton = new MMInput.IMButton(PlayerID, "Bark", BarkButtonDown, BarkButtonPressed, BarkButtonUp));
	}

	public virtual void BarkButtonDown() { BarkButton.State.ChangeState(MMInput.ButtonStates.ButtonDown); }
	public virtual void BarkButtonPressed() { BarkButton.State.ChangeState(MMInput.ButtonStates.ButtonPressed); }
	public virtual void BarkButtonUp() { BarkButton.State.ChangeState(MMInput.ButtonStates.ButtonUp); }
}
And finally, here are steps to do that same thing but with the Input System and extending the engine’s MinimalLevel_InputSystem_Multiplayer:
Creating a new input entry by extending the InputSystemManagerEventsBased
- in Unity 6000.5.0f1 (or higher), create a new project and import Corgi Engine v10.0 via the Package Manager + input system
- open the MinimalLevel_InputSystem_Multiplayer demo scene
- edit the CorgiEngineInputActions, add a new Bark entry, bind it to Keyboard / B, add a Press & release interaction for it, save the asset
- add the MyOwnInputManager class and CharacterBark to your project (see code at the bottom of this recipe). The first one simply extends the input manager (event based), the second is a simple ability that checks if the newly added button is pressed and outputs to the console if it is
- on the InputSystemManager_Player1, replace the InputSystemManagerEventsBased with the MyOwnInputManager component, do the same for InputSystemManager_Player2
- edit the Rectangle character, add this test ability to it, enter play mode, press B to bark
CharacterBark:
using MoreMountains.CorgiEngine;
using MoreMountains.Tools;

public class CharacterBark : CharacterAbility
{
    protected override void HandleInput()
    {
        base.HandleInput();
        if ((_inputManager as MyOwnInputManager).BarkButton.State.CurrentState == MMInput.ButtonStates.ButtonDown)
        {
            MMDebug.DebugLogTime("Bark.");
        }
    }
}
MyOwnInputManagerEventsBased:
using MoreMountains.CorgiEngine;
using MoreMountains.Tools;
using UnityEngine.InputSystem;

public class MyOwnInputManagerEventsBased : InputSystemManagerEventsBased
{
  public MMInput.IMButton BarkButton { get; protected set; }
  public void OnBark(InputValue value) { BindButton(value, BarkButton); }

  protected override void InitializeButtons()
  {
    base.InitializeButtons();
    ButtonList.Add(BarkButton = new MMInput.IMButton(PlayerID, "Bark", BarkButtonDown, BarkButtonPressed, BarkButtonUp));
  }

  public virtual void BarkButtonDown() { BarkButton.State.ChangeState(MMInput.ButtonStates.ButtonDown); }
  public virtual void BarkButtonPressed() { BarkButton.State.ChangeState(MMInput.ButtonStates.ButtonPressed); }
  public virtual void BarkButtonUp() { BarkButton.State.ChangeState(MMInput.ButtonStates.ButtonUp); }
}