Introduction
The asset comes with some basic AI scripts, that may be fine for standard enemies (or friends), but if you want to create more complex behaviours, the Corgi Engine provides an advanced AI system that will help you create all sorts of interesting patterns and attitudes. These will be more costly than the base actions, but will also give you more control and complex behaviours. Of course, pick one system or the other, combining both wouldn’t work. For a brief overview of what you can do with it, you can have a look at the RetroAI demo scene, which will showcase a tiny portion of the things you can create with this system.
Core concepts
The Advanced AI system is based on a few core classes you’ll find in the MMTools/AI/ folder :
- AIState : A State is a combination of one or more actions, and one or more transitions. An example of a state could be “patrolling until an enemy gets in range”.
- AIAction : Actions are behaviours and describe what your character is doing. Examples include patrolling, shooting, jumping, etc. The engine comes with a lot of predefined actions, and it’s very easy to create your own.
- AIDecision : Decisions are components that will be evaluated by transitions, every frame, and will return true or false. Examples include time spent in a state, distance to a target, or object detection within an area.
- AITransition : Transitions are a combination of one or more decisions and destination states whether or not these transitions are true or false. An example of a transition could be “if an enemy gets in range, transition to the Shooting state”.
- AIBrain : the AI brain is responsible from going from one state to the other based on the defined transitions. It’s basically just a collection of states, and it’s where you’ll link all the actions, decisions, states and transitions together.

All of these will be put on top of an already setup character (check out the dedicated doc for more on this) and can potentially leverage all existing abilities.
Creating an advanced AI character
We’ll recreate one of the example characters available in the RetroAI demo scene, the yellow RetroSwordsman. Creating the base character is no different from creating any character, so we won’t go over that again here. Once that base character is ready, you’ll want to add an AIBrain to it.
What we want from this character is the following behaviour : patrol until an enemy gets close enough, and if that’s the case use our weapon. Then after a certain time get back to patrolling (and repeat).
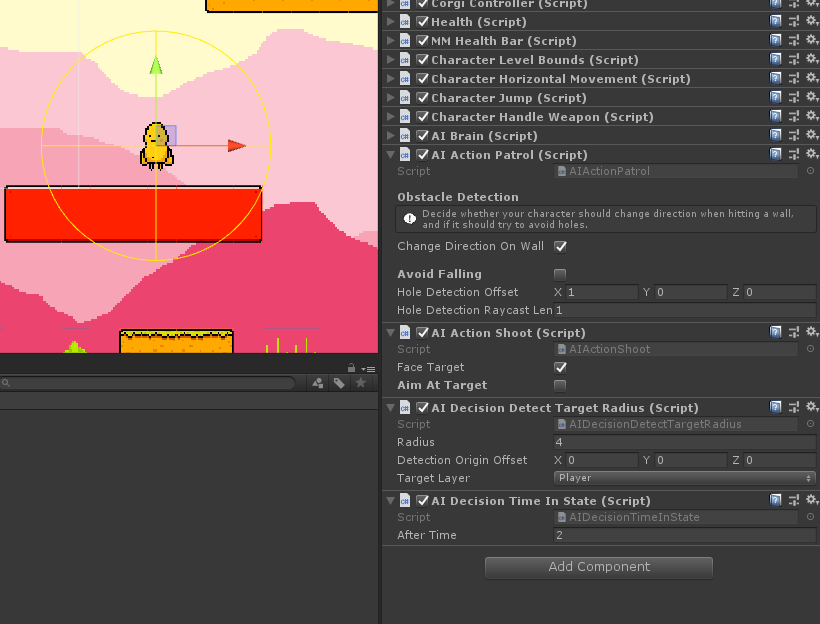
To get there, we’ll use some of the ready made actions and decisions available in the engine. We’ll add the following components : AIActionPatrol, AIActionShoot, AIDecisionTargetRadius, and AIDecisionTimeInState. Each of these comes with an inspector where we’ll need to set a few things :
- AIActionPatrol : we’ll want to make sure our character changes direction on walls, so we’ll check that. The rest can remain as it is.
- AIActionShoot : our character is equipped with a melee weapon that doesn’t require aiming, but we’ll want it to face its target, so we’ll check that.
- AIDecisionTargetRadius : we’ll want our character to attack if the player gets within 4 units. We’ll set the radius to 4, leave the origin offset to zero (the center of our character will be used to determine the area), and we’ll select the Player target layer as we want this enemy to only attack the player.
- AIDecisionTimeInState : we want our character to resume patrolling 2 seconds after attacking, so we’ll put “2” in After Time.
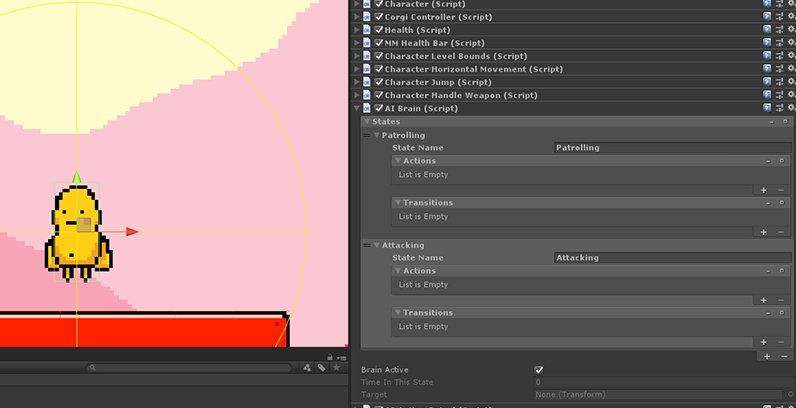
Our character now has all the actions and decisions we need to define its behaviour. All that’s left to do is plug all that into its brain. As stated before, our character will have 2 states : patrolling and attacking. So in its AIBrain component, we’ll simply add two states by pressing the bottom right “+” sign twice. We’ll name our first state “Patrolling” and our second state “Attacking”.
Now in the Patrolling state we’ll only have one action, and one transition, so we’ll add an Action and a Decision by pressing their respective “+” signs once each. We’ll now drag our character’s AIActionPatrol component into the Actions’ array slot, and we’ll drag the AIDecisionTargetRadius into the Transitions’ first Decision slot. Note that from v6.6 onwards, you can also select that action from a dropdown. We want to switch to attacking when the player is in range, so we’ll put “Attacking” in our transition’s True State field.
We’ll proceed in the same way for our second state : we’ll add an action and a transition, then drag our AIActionShoot component into our Shooting state’s Action slot, and our AIDecisionTimeInState into our state’s transition’s decision slot. We want to go back to patrolling after attacking, so we’ll put “Patrolling” into our True State field. And that’s it, press play and your character is ready!
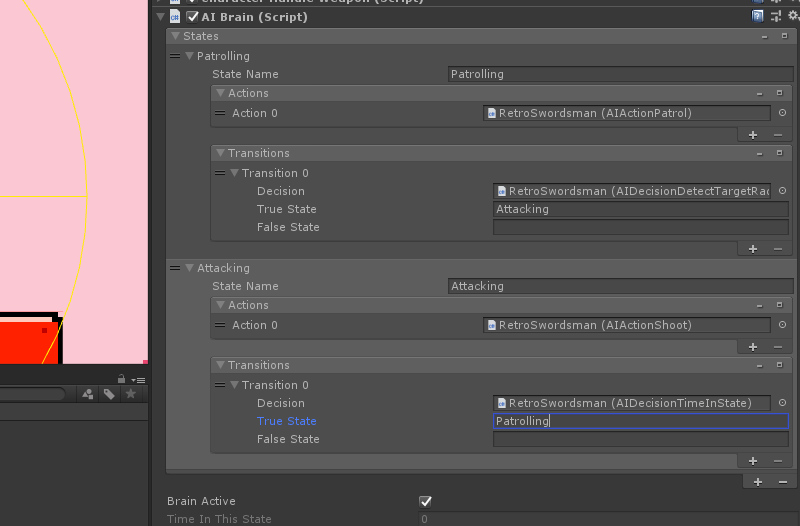
To make sure our brain is properly setup, we can just “read” it. From top to bottom, we have a first Patrolling state, in which our character will patrol (AIActionPatrol) until an enemy is in range (AIDecisionTargetRadius), and if that’s the case it’ll go to Attacking, which is a state in which our character will attack (AIActionShoot - shoot works for all weapons, including melee), and it’ll come out of this state if its AIDecisionTimeInState is true, in which case it’ll go back to patrolling.
Congratulations, you’ve completed what is probably the “hardest” thing to do with the Corgi Engine, and you now know how to create all sorts of character behaviours. You can of course have more than one action in a state (running and jumping for example), more than one decision in a transition, and more than one transition, so you can really come up with complex stuff.
Actions
The engine comes with all of these predefined actions, ready to use in your own characters :
- AIActionChangeWeapon: used to force your character to switch to another weapon. Just drag a weapon prefab into its NewWeapon slot and you’re good to go.
- AIActionClimbLadder: lets AI agents climb up and down ladders, you can see an example of it in action in the RetroAI demo scene
- AIActionCrouchStart: forces an AI agent to start crouching
- AIActionCrouchStop: forces an AI agent to stop crouching
- AIActionDash: this action will perform one dash. Requires CharacterDash. The RetroBlobDash enemy in the RetroAI demo scene uses it.
- AIActionDoNothing: as the name implies, does nothing. Just waits there.
- AIActionFlyPatrol: allows a flying character to patrol through a set of node.
- AIActionFlyTowardsTarget: you’ll need a CharacterFly ability for this one. Makes the character fly up to the specified MinimumDistance in the direction of the target. That’s how the RetroGhosts move.
- AIActionJump: performs the defined number of jumps. Look below for a breakdown of how this class works.
- AIActionMMFeedbacks: plays a target MMFeedbacks or MMF Player
- AIActionMoveAwayFromTarget: directs the CharacterHorizontalMovement ability to move in the opposite direction of the target.
- AIActionMoveTowardsTarget: directs the CharacterHorizontalMovement ability to move in the direction of the target.
- AIActionPatrol: patrols until it (optionally) hits a wall or a hole.
- AIActionPatrolAndJump: same as above, but jumps every time it hits the ground while doing so. You can see an example of it with the RetroBlobPatrolAndJump prefab in the RetroAI demo scene
- AIActionPatrolWithinBounds: same thing but you can also define left and right bounds that the character can’t exceed.
- AIActionReload: this action will trigger a request to reload on the weapon
- AIActionResetTarget: an action that lets you empty your AIBrain’s target
- AIActionSetLastKnownPositionAsTarget: will set the last known position of the target as the new Target.
- AIActionSetTransformAsTarget: will set the specified transform as the new Target.
- AIActionSetPlayerAsTarget: will set the player (as known by the LevelManager) as the new Target of the AI Brain.
- AIActionShoot: shoots using the currently equipped weapon. If your weapon is in auto mode, will shoot until you exit the state, and will only shoot once in SemiAuto mode. You can optionnally have the character face (left/right) the target, and aim at it (if the weapon has a WeaponAim component set to Script mode).
- AIActionSelfDestruct: kills the AI character
- AIActionSwapBrain: lets you swap an entire Character’s current Brain for another one. Useful for things like boss phases, for example. You can even opt to pass the old brain’s Target to the new one.
- AIActionTakeStairsTowardsTarget: lets a Character with the CharacterStairs take stairs towards its target as it moves. See the MinimalStairs demo scene for an example of it in action.
- AIActionUnityEvents: lets you trigger any Unity event you bind into its inspector
Just like everything else in the engine, you’re encouraged to create your own. Let’s look at an Action’s code to see how it works :
public class AIActionJump : AIAction
{
    public int NumberOfJumps = 1;
    protected CharacterJump _characterJump;

    protected int _numberOfJumps = 0;

    protected override void Initialization()
    {
        _characterJump = this.gameObject.GetComponent<CharacterJump>();
    }

    public override void PerformAction()
    {
        Jump();
    }

    protected virtual void Jump()
    {
        if (_numberOfJumps < NumberOfJumps)
        {
            _characterJump.JumpStart();
            _numberOfJumps++;
        }
    }

    public override void OnEnterState()
    {
        base.OnEnterState();
        _numberOfJumps = 0;
    }
}
As you can see this class overrides a few methods :
- Initialization, in which we’ll do whatever we need to do to initialize our Action, in this case we store the CharacterJump ability for future use.
- PerformAction : this will be called everytime our character is in the state this Action is in. In this case we’ll just call our Jump method, that in turns calls the CharacterJump ability’s JumpStart method if our conditions are met.
- OnEnterState : everytime we’ll go back to the state that contains this Action, we’ll want to reset our current number of jumps.
Decisions
- AIDecisionDetectTargetLine : will return true if any object on its TargetLayer layermask enters its line of sight. It will also set the Brain’s Target to that object. You can choose to have it in ray mode, in which case its line of sight will be an actual line (a raycast), or have it be wider (in which case it’ll use a spherecast). You can also specify an offset for the ray’s origin, and an obstacle layer mask that will block it.
- AIDecisionDetectTargetRadius : will return true if an object on its TargetLayer layermask is within its specified radius, false otherwise. It will also set the Brain’s Target to that object.
- AIDecisionDistanceToTarget : will return true if the current Brain’s Target is within the specified range, false otherwise.
- AIDecisionGrounded : will return true if the character is grounded, false otherwise.
- AIDecisionHealth : will return true if the specified Health conditions are met. You can have it be lower, strictly lower, equal, higher or strictly higher than the specified value.
- AIDecisionHit : returns true if the Character got hit this frame, or after the specified number of hits has been reached.
- AIDecisionLineOfSightToTarget : will return true if there is an unobstructed line of sight between this AI and its current target
- AIDecisionNextFrame : will return true when entering the state this Decision is on.
- AIDecisionRandom : will roll a dice and return true if the result is below or equal the Odds value
- AIDecisionReloadNeeded : will return true if a reload is required on the currently equipped weapon
- AIDecisionTargetFacingAI : will return true if the Brain’s current target is facing this character. Yes, it’s quite specific to Ghosts. But hey now you can use it too!
- AIDecisionTargetIsAlive : will return true if the target is alive, false otherwise
- AIDecisionTargetIsNull : will return true if for some reason the target has become null
- AIDecisionTimeInState : will return true after the specified duration (in seconds) has passed since the Brain has been in the state this decision is in. Use it to do something X seconds after having done something else.
- AIDecisionTimeSinceStart : will return true after the specified duration (in seconds) has passed since the level was loaded.
And just like Actions, it’s very easy to create your own Decisions.
Organizing AI components
When building complex characters, your Character’s inspector list of components can get pretty massive, between the agent’s core classes (Character, Corgi Controller, etc), the abilities, and the brain, actions and decisions. Fortunately, v6.6 introduced the ability to split these abilities across multiple nodes, and that’s also true for the brain, actions and decisions.
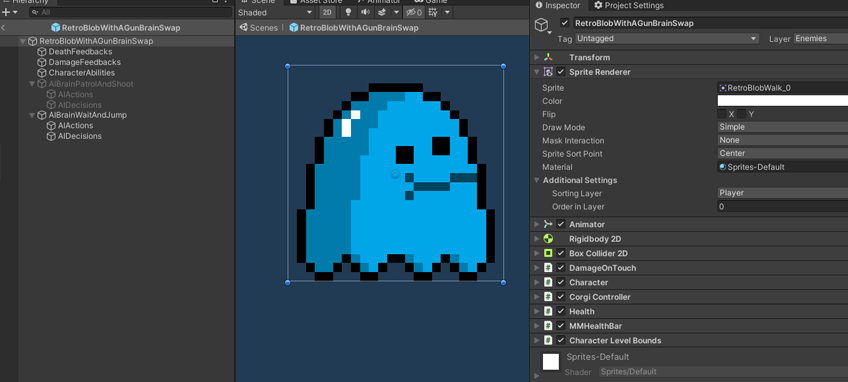
You can see an example of a Character setup that way in the RetroAI demo scene, with the RetroBlobWithAGunBrainSwap prefab. At its top level, you’ll find its core classes. Then, on empty game objects nested under it, you’ll find a node with its abilities (CharacterAbilities), one with a first brain (AIBrainPatrolAndShoot), and then another, completely different one (AIBrainWaitAndJump). And under each of these brain nodes, you’ll find other nodes with each brain’s respective actions and decisions. The only important thing about this setup is to make sure you’ve bound your Brain to the Character’s inspector, in its CharacterBrain field. If you don’t, it’ll automatically look for one at its own level. And for abilities, you can learn more about it in the dedicated section of the documentation.