Introduction
Your game is very likely gonna be made of multiple levels, or sections. In the Corgi Engine, just like in Unity in general, there are multiple ways you can structure your levels. The most straigthforward way to do it is to create a scene per level, and have a door/gate/finish line at the end of your level that leads to the next level, but you can also create multiple sections within a single scene. On top of that, the engine comes with ways to link your levels, save data over them, create level selection screens and character selection screens. This page covers all that.
Going to another scene with the Loading Scene Manager
With Unity, usually when you want to go to another scene (in a menu, or to go from one level to the next for example), you’d use the SceneManager API, and probably the SceneManager.LoadScene() method. The native method doesn’t provide enough (or any) visual feedback to the player, and scene loading on mobile for example can be a few seconds long, so just having a black screen there isn’t really good looking. To fix that, the engine comes with its own scene change API, that you’re completely free not to use if you don’t like it.
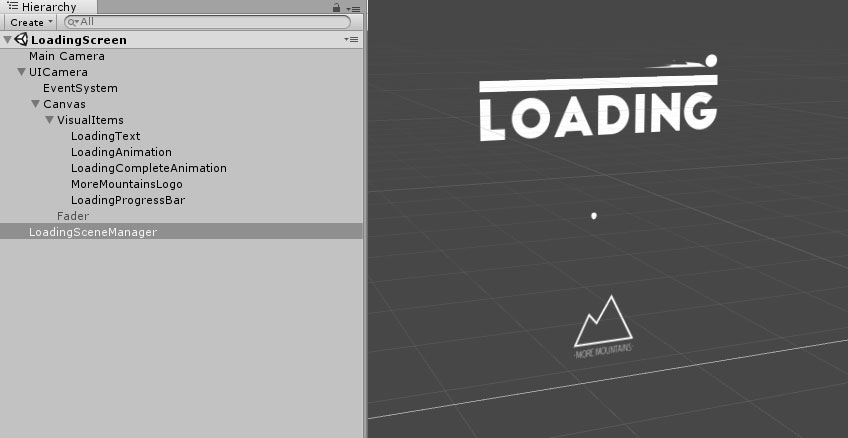
If you want to provide a better experience to your player, you can use the MMSceneLoadingManager :
- it can be called from anywhere, you don’t have to have a MMSceneLoadingManager in your scene
- it handles loading (as the name implies), showing an animation and a progress bar
- it’s completely customizable, just edit the ThirdParty/MoreMountains/MMTools/Tools/MMSceneLoading/LoadingScreens/LoadingScreen scene’s contents. You can easily add your own logo, change the look of the progress bar, what animation is playing, etc.
- it’s pretty simple to use
To use the MMSceneLoadingManager API, when you want to change level, just call the LoadingSceneManager.LoadScene (string sceneToLoad) method. The string parameter you pass must of course match the name of the scene you’re trying to load. So if you were to load the minimal demo multiplayer level for example, you’d use :
MMSceneLoadingManager.LoadScene ("Minimal4Players");
And the engine will take care of the rest ![]()
Scene Loading via the LevelManager
From the LevelManager’s inspector, you can define a LoadingSceneMode. This method will then be used by a few classes in the engine, like the FinishLevel script or the LevelSelector, to go from one scene to the other. Three modes are available :
- UnityNative : will simply use the SceneManager API to load a new scene
- MMSceneLoadingManager, will use the MMSceneLoading API to load a new scene, as described above. In that mode you’ll have to specify what scene to use as your loading scene. Out of the box you can set “LoadingScreen” to use the scene of the same name. Make sure you add it to your build settings.
- MMAdditiveSceneLoadingManager, will use the more advanced additive scene loading system. You’ll also have to specify a loading scene name, and you can pick any of the additive ones located at ThirdParty/MoreMountains/MMTools/Tools/MMSceneLoading/LoadingScreens/LoadingScreen. If you don’t know which one to pick, start with MMAdditiveLoadingScreen. This mode offers many options, and will give you full control over timing at each and every step, including fade tweens, thread priority, delays, and more.
Level Selection
The engine comes with two built in examples of level selection. One is a carousel containing cards showing info about each level, and you can see it in action in the RetroAdventureLevelSelection scene, as well as in the LevelSelection demo scene. The other is a Mario World style map, available for demo in the LevelSelectionMap scene. Both of these are fairly simple in terms of logic, simply using the LoadingSceneManager to go to the selected level.
Character Selection
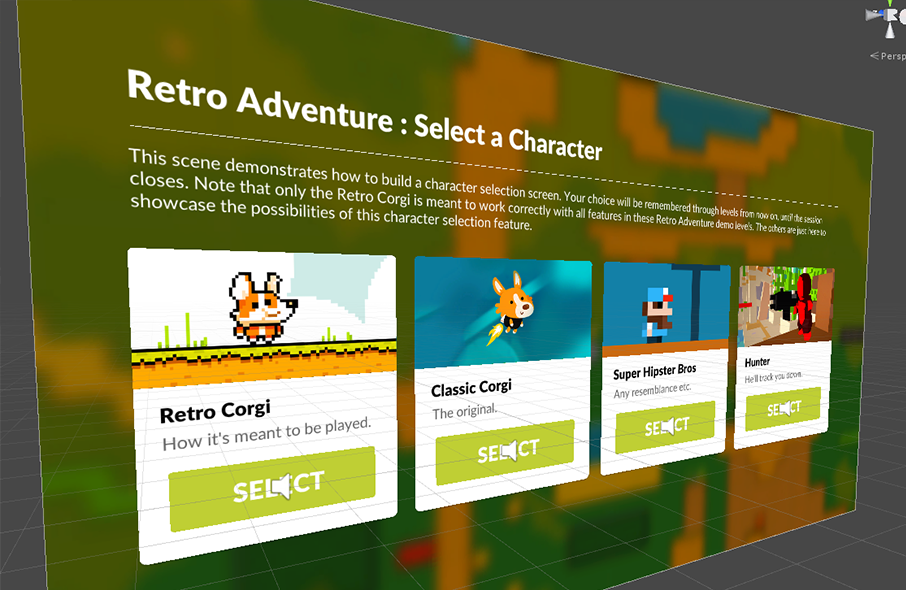
You may want to tell the level you’re going to what character to use, based on a player selection. The RetroAdventureCharacterSelection shows an example of that. The way it works is that once that choice has been made, the selected character gets stored in the GameManager, a persistent object that will live for the duration of the game session (until you quit the game). This means that once a character is selected, that selection will remain for all levels, unless told otherwise.
Rooms inside a scene
In certain situations, it might be a good idea to create different sections within a bigger scene. In this case, you’ll want to use the Teleporter component. You can see it in action in many of the demo levels, and a focus on that in the MinimalRooms1 demo scene. It’s quite simple to use, you just need two of them (or more) in your scene, you link them via their inspector, define their behaviour, and you’re good to go. And if you want to do even more and use the advanced Rooms system integrated within the engine, you can learn more about it in the Rooms system documentation.
Moving to a certain point in another scene
The engine also allows you to link different scenes together and specify where to start in each scene, based on where you’re coming from. Maybe you climbed to the top of scene A, and there’s a door there that sends you to Scene B. But there may also be a door at the bottom of scene A that sends you to scene C. And once you’re in SceneB you want to go back to the top of A, etc. That’s exactly what the MinimalRooms1 and MinimalRooms2 demo scenes demonstrate. They use the GoToLevelEntryPoint component.
It’s quite easy to use but requires some setup. First you need to create Entry Points in your target level (if you’re in Scene A and want to go to Scene B, your target level is Scene B). To create Entry Points in Scene B, just create and position empty objects, or pick existing ones (checkpoints for example). Then select your Scene B’s LevelManager, and in its inspector, define how many points of entry you want for this scene, and bind them there one by one. Once this is done, go back to Scene A, create a door/object with a GoToLevelEntryPoint script on it. Set its various activation conditions and settings however you prefer, set the Level Name accordingly (Scene B in our example), and set the point of entry index for this object. Remember, indexes start at 0. So if you have 3 entry points in SceneB’s LevelManager, index 0 is the first point in that list, index 1 is the second, and so on. And that’s it, you’re good to go!
Setting up points of entry to go to a specifc point in another scene
- in Unity 6000.5.0f1 (or higher), create a new project and import Corgi Engine v10.0 via the Package Manager**
- duplicate the MinimalLevel demo scene twice, name the new scenes SceneA and SceneB
- add them to your build settings (edit > build settings, then drag both SceneA and SceneB into the “scenes in build” panel)
- open SceneB, add a new, empty game object at 0,-3,0, name it Entry0, add another at 15,-3,0, name it Entry1
- select the LevelManager, and add both Entry0 and Entry1 to its PointsOfEntry list, save the scene, make sure you set the DebugSpawn to null
- in SceneA, create a new sprite, set its sprite to AchievementsIcons_6 (or any sprite of your choice), position it at -5,-4,0
- add a BoxCollider2D to it, isTrigger:true
- add a GoToLevelEntryPoint component to it, under ActivationConditions, set AutoActivation:true, under Finish Level, set LevelName to SceneB, save the scene
- press play, walk right to collide with the sprite, sceneB will load and you’ll spawn where you positioned the first entry point
- exit play mode, select your GoToLevelEntryPoint, set PointsOfEntryIndex to 1, press play, walk to it, sceneB will load and you’ll spawn where you positioned the second entry point
One way levels
The Corgi Engine lets you setup one-way levels, which force the character in going forward in a specific direction, without the possibility to go back where they come from. The engine makes it extremely simple to setup, via a single class, OneWayLevelManager. You can see examples of it in use in the following demo scenes : MinimalOneWayLevelHorizontal, MinimalOneWayLevelVertical and MinimalOneWayLevelAutoScrolling.
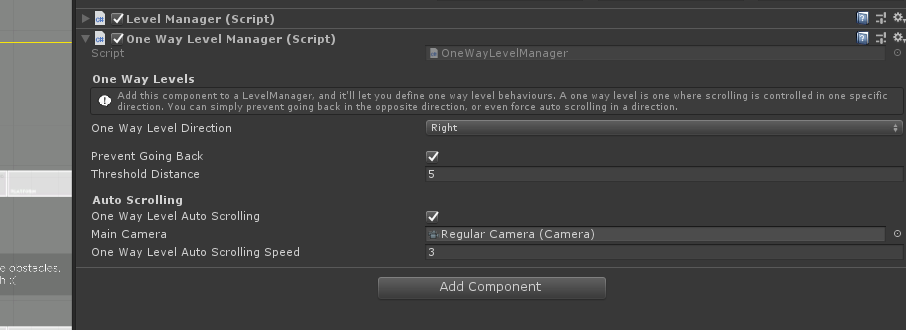
To setup a one way level, select your scene’s LevelManager, and add a OneWayLevelManager component to it. From its inspector you can define the level’s direction (right will go from left to right, left from right to left, etc), you can decide whether or not the character can go back (maybe you’ll want to turn this on or off at different points in the level), and the threshold distance, which is the distance from the character at which the level follows it.
In addition to that, you can make your level auto scrolling. Your camera will move automatically in the selected direction, at the specified speed.
This class’ API makes it very easy to interact with it at runtime. In the MinimalOneWayLevelAutoScrolling demo scene for example, you’ll notice a Stopper and an Accelerator colliders, which both have a MMTriggerAndCollision class on them that respectively disable auto scroll and change its speed.
Managing large levels
If you decide to go for very large levels, there’s a good chance you’ll have to start looking into Unity optimization. While most of the tricks you can use to optimize your game are very game specific (asset optimization, shaders, etc), the engine comes with a few tools you can leverage to hide disable that has no business being active at all time. If you’re using the Rooms system, you can specify on each room (via the Room inspector) what objects you’d like to enable/disable when entering or exiting the room.
You can also use the Proximity Manager. Introduced in v6.5, it will let you enable/disable objects based on their proximity to the player. AI characters at the very end of your level (probably) don’t need to be active until they’re on screen, and disabling them until then will free CPU resources. You can check the MinimalPerf demo scene for an example of this in action. It’s very easy to use, as all you need to do is add a ProximityManager to an empty object in your scene, and add ProximityManaged components to all the objects you’d like it to manage.
Procedural Generation of Levels
While most of the demos in the engine feature handcrafted levels, already determined in editor when the scene starts, nothing prevents you from generating your levels procedurally. There are only two things you need to be careful of :
- make sure the levels you generate your levels on Awake, so that they’re ready to use on Start.
- make sure your level conforms to the engine’s specs, and that the outcome of the generation matches what you would have done by hand (platforms are on the Platforms layer, the level manager’s bounds are correctly resized, etc).
You’ll find an example of it in the RetroProcedural demo scene. This scene uses an extended version of the MMTilemapGenerator, the TilemapLevelGenerator. The TilemapLevelGenerator is custom made for the Corgi Engine, and will not only generate a new tilemap based on the rules you’ll have defined, but will also place an entry and exit at reasonable and reachable positions, sprinkle the level with objects to collect (or any objects or agents, really) and will resize the level manager. You can use it as is, if it fits your needs, or you can look at it for reference to implement your own procedural generation system.
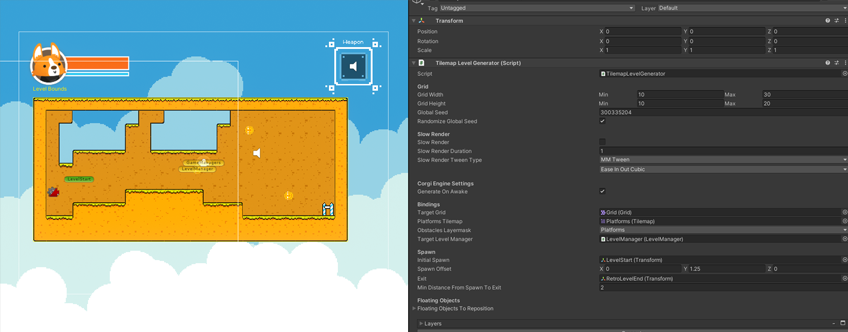
The TilemapGenerator works by generating a grid of 0s and 1s, and painting a Unity Tilemap with these (0 remains empty, 1 becomes a full tile). It uses a number of different algorithms to generate these arrays of 0s and 1s, and lets you combine and customize them to get very unique results.
Here’s a breakdown of its inspector, which will let you generate all sorts of levels :
- Grid : lets you define your grid’s size. You can set a min and max value for both its width and height. This will generate a random size between these min and max bounds, for cases where you wouldn’t want your levels to always be the same size. Of course if you set the same value for your width’s min and max, it’ll remain constant.
- Global Seed : this generator is seeded, which means that if you use the same seed you’ll always get the same result. This could be useful if you wanted, for example, your character to be able to go back to a previous generated level. All you’d have to do would be to store that seed and regenerate a level using it. A checkbox also lets you generate a new seed automatically, but you could handle that generation on your own if you wanted to.
- Slow Render : this is just for show, and will only work at runtime. It lets you render the generation of the level tile by tile. It looks good. Not very practical (and likely to cause issues) if you were to do it outside of test purposes.
- Corgi Engine Settings : a checkbox will let you decide whether generation should happen automatically on Awake. Bindings will let you define what Grid to use, what tilemap to consider as platforms, what layer(s) platforms are on, and a last slot will let you bind your LevelManager. Then you can bind your InitialSpawn and Exit, and define the distance you’d like to keep between them. On generation, the system will generate a new level, and then place these two at reachable positions.
- Floating Objects : the generator lets you specify a number of objects to reposition. These will be attributed a new position on generation, at a spot within the grid where no platform is found.
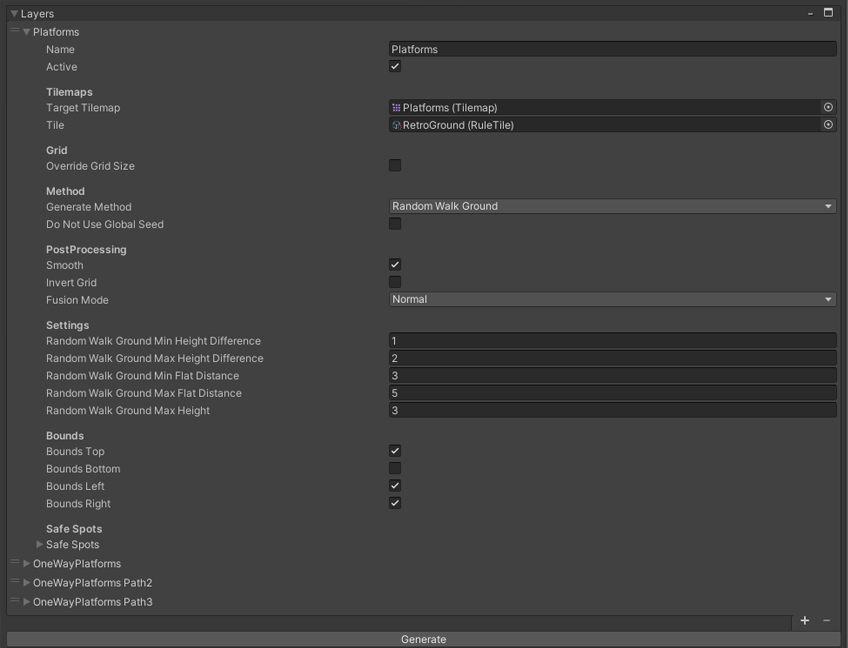
- Layers : this is where the magic happens. Each layer will be made of a target tilemap to paint on, and settings defining how the tiles will be painted. A breakdown of these settings follows :
- Layers : Name : purely used for your own organization purposes, usually designates what that layer will paint
- Layers : Active : if this is not checked, that layered won’t be processed when generating the level
- Layers : Tilemaps : lets you drag a target tilemap to paint on, as well as what Tile to use to paint on it
- Layers : Override Grid Size : by default each layer will paint on a grid of the size of the generator’s general Grid size settings. But you can also override that on a per layer basis.
- Layers : Post Processing : the Smooth option will apply smoothing on the generated grid, attenuating isolated points and spikes everywhere. Invert grid will turn all 0s into 1s, and vice versa. If you’re happy with a shape but think “if only it was the opposite of that”, that’s the checkbox for you.
- Layers : Fusion Mode : these fusion modes will be applied on layers from top to bottom (the last to speak wins). Normal just generates a grid, default mode. NormalNoClear generates a grid, but doesn’t clear it first. Intersect : when painting on a target grid that already has content, will only keep the resulting intersection. Combine : adds the result of this grid to the existing target. Subtract : removes the result of this grid from the existing target.
- Layers : Generate Methods : a number of algorithms you can use to generate patterns. Full : fills the entire grid. Perlin : uses perlin noise to generate a pattern. PerlinGround : same thing, but will aim at keeping a walkable “ground” at the bottom of the grid. Random : randomly paints 0s and 1s. RandomWalk : picks a starting position, then paints like an agent leaving a trail, on a path. RandomWalkAvoider : same thing, but the Walker will avoid obstacles on a separate tilemap you can specify. RandomWalkGround : randomly paints a trail, but tries to keep a walkable ground. Path : carves a path of the specified randomized dimensions. Copy : copies a target tilemap.
- Layers : Bounds : Paints with 1s the left, right, top or bottom bounds (or combinations of those).
- Layers : Safe Spots : lets you define a number of safe spots (defined in grid coordinates) in which that layer will only paint 0s.
This system can take some getting used to, but it’s powerful and can act as a good foundation for your own, bigger solution. Don’t hesitate to look at the RetroProcedural demo scene, in it you’ll find a generator with 4 simple layers already setup to generate interesting patterns :
- Platforms : this layer paints a random walkable ground as well as bounds on the top, left and right
- One Way Platforms : draws a smooth path of 1 way platforms from bottom to top
- One Way Platforms Path2 : combines with the layer above to carve another vertical path
- One Way Platforms Path3 : adds an horizontal path of one way platforms, these 3 layers combining to always get two vertical “holes” and a generally horizontal set of one way platforms background above our ground * One last thing : there’s no limit to this system. The demo generates relatively small levels (it was faster to test), but with a few tweaks to the layers described above and a Grid size multiplied by 10, you can generate entire worlds :
