Introduction
The Corgi Engine was created as an alternative to physics based platformers, aiming to provide a tighter gameplay, faster, and more predictable than physics. To do so, the engine implements its own “physics” : collision detection, movement, etc. Note that this is absolutely not a physics engine, this is not compatible with regular Unity physics, and if you’re planning on recreating Angry Birds, this will not do the trick.
The Corgi Controller is at the heart of this system. It’s the basis for each character. Its main function is to handle collisions, and basic movement. You’ll be able to add or set forces to it, usually via Character Abilities, which will make it move.
To handle collisions, the Corgi Controller uses Collider2Ds (any type, BoxCollider2D, CircleCollider2D, PolygonCollider2D…) and raycasts, which you can see in the scene view when playing your game. Basically how it works is that the controller is casting small rays all around itself, like tiny lasers. If a horizontal laser hits a Collider2D, then we’ve probably hit a slope, or a wall (in the context of the engine, any slope more than 45° strong). If a vertical ray hits a Collider2D, we’ve hit the ground or the ceiling. Depending on the forces being applied every single frame, and based on whether or not the raycasts hit something or not, the controller will move the object around the scene, or make it stop to prevent it from entering a wall for example.
Being at the center of your character, the Corgi Controller’s inspector settings are quite important. There you’ll be able to define the gravity, various speed factors, what slopes the character can climb (and at what speed).
You’ll also need to define Collision Masks. The Corgi Controller can interact with different types of platforms :
- regular platforms (Platforms)
- moving platforms
- one way platforms (platforms you can jump on from underneath)
- one way moving platforms
- mid height one way platforms (like one way platforms that are lower than your character’s mid point and that you can traverse or hop on)
- stairs (which behave very much like the ones in Castlevania for example, a slope that connects with the ground and that can be ignored or climbed on)
By default, the engine comes configured with a number of layers, and there’s one for each of these platforms : Plaforms, MovingPlatforms, OneWayPlatforms, MovingOneWayPlatforms, MidHeightOneWayPlatforms, Stairs respectively. If you add more layers, or change these, make sure to replicate these changes on your characters.
From the inspector you can also customize the raycasts. Their number really depends on the size of your character. What you’ll want to achieve is as few raycasts as possible (for performance reasons, even though raycasts are not really an issue these days), but with raycasts close enough to each other that no platform/enemy/whatever could fit between two raycasts (and in this case wouldn’t be detected by the engine).
Colliders
The engine supports Unity’s native 2D colliders to define the bounds of each object. You can use BoxCollider2D, CircleCollider2D, PolygonCollider2D for most platforms, and you’ll want to use EdgeCollider2D for your one-way platforms (and one-way moving platforms, and mid height one-way platforms, and all things one-way). You can’t have a BoxCollider2D on one-way platforms.
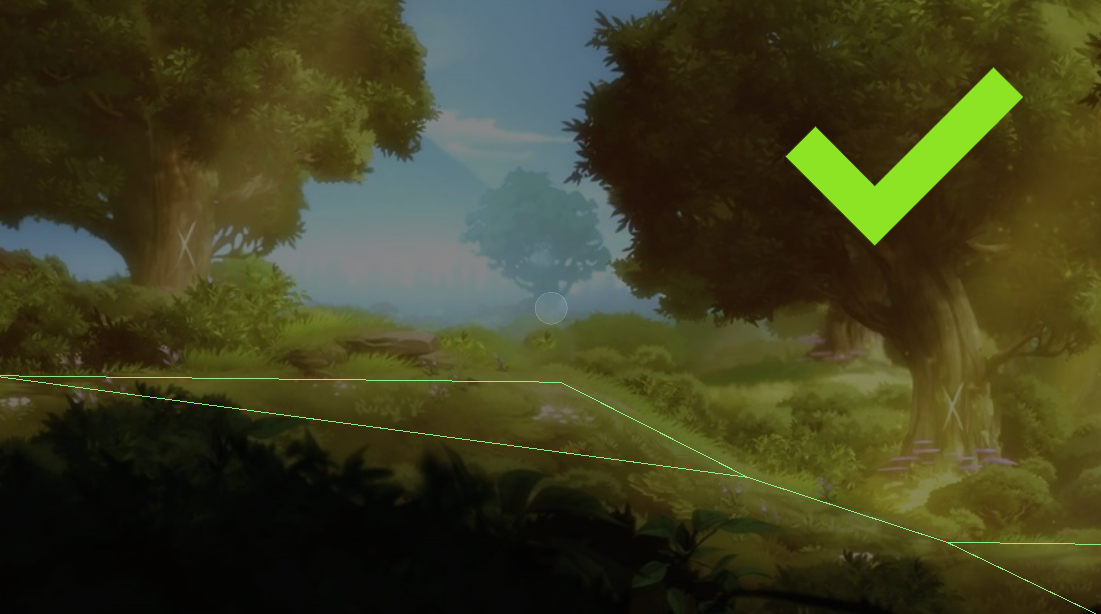
The engine is designed for tight gameplay, and encourages good level design. In most cases, you’ll likely be dealing with simple shapes, or maybe tilemaps. These are simple and obvious to handle, and the box colliders Unity provides will likely cover most of your cases. But if you want to go for a more organic look, it’s important to keep in mind that there while your visuals can be anything you want, your colliders still have to make sense. A classic (and tempting) mistake is to simply add a PolygonCollider2D to any shape, and this is usually the result :

This is pretty bad, and will cause issues. It’s bad for performance, and bad for gameplay. If you want to use polygon colliders you can, but you’ll have to edit them manually (or automate their creation in a way that doesn’t output garbage geometry).
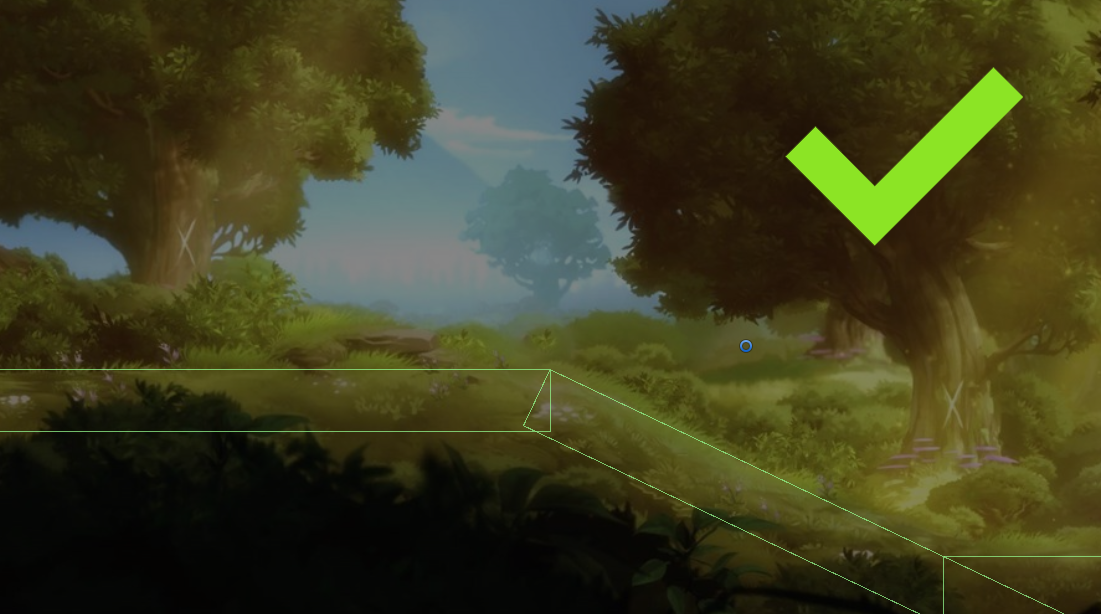
This is a better example of the collider you’ll want to aim for :
Lastly, you can also simply use box colliders. Most people like to blockout / graybox their levels using primitives. The engine comes with a lot of them, ready to use, you’ll find them in Demos/Minimal/Prefabs/Platforms (and other folders nearby). In the example above, the colliders are made of such blocks, positioned using Unity’s snapping (select a platform, press V, drag and drop one of its vertices on top of another box’s corner), and then their sprite renderers are turned off, only the colliders remain. You still get visually organic shapes, but maintain tight gameplay.
Visuals vs logic
Sometimes you’ll want to have a very tight gameplay, but a very organic-looking environment, with uneven surfaces and visually accurate collisions. You don’t need to chose between both, a good solution is often to decouple your visuals from your logic.
A good example of that can be seen in Reclamation, an amazing claymation platformer made with the Corgi Engine by Hat Hair Games. It uses cutting edge photogrammetry techniques to scan actual clay environments, and that results in beautifully uneven surfaces. Beautiful, but not fit for a tight gameplay, if the colliders were to match the surfaces.
So instead, Hat Hair Games chose to create their colliders on a perfect grid. This is great for level design, makes for consistent and predictable gameplay. But now there’s a disconnect between visuals and logic. In the screenshot below, you can see the colliders are very well made, and positioned on a grid, on top of beautiful organic models, but the character glitches through them :
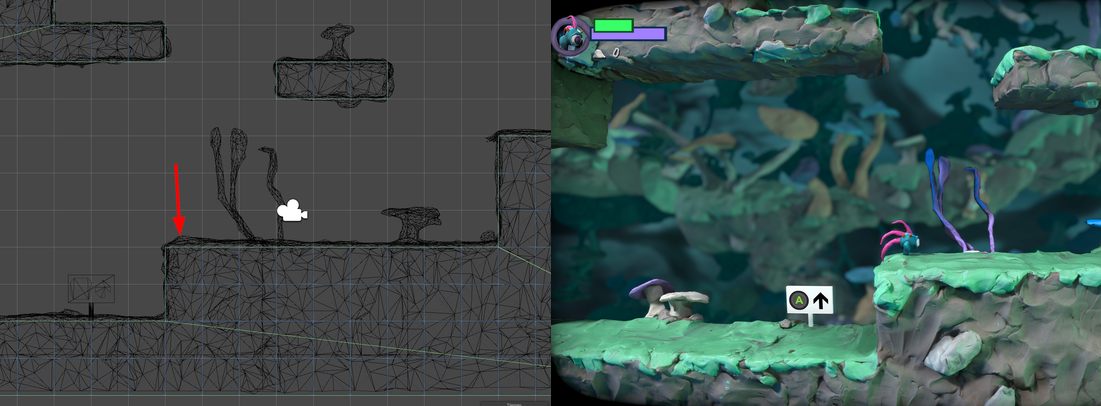
So how to fix this? They could have the colliders match the actual platform visuals, but that could result in a more janky gameplay and would decrease performance. Instead, they’ve chosen to let the simple, perfect colliders be used for the logic by the Corgi Controller, while they use separate, 3D colliders to simply detect the ground height via a raycast, and offset the character model vertically based on this. The video below shows the result in action :
This gives Hat Hair Games complete control over visuals to ensure a perfect result. And as they’re using 2D colliders for the gameplay, and 3D colliders for their environment visuals, they can use all layers on both the 3D and 2D side, as well as use UV coordinates to define different footstep sound areas.
Of course, how models can and should be adjusted depends entirely on your art pipeline and level design. But it’s a very simple way to get both a very tight gameplay and very complex looking visuals.
Layers
The engine relies on layers to identify certain objects, notably platforms. Layers are metadatas you can associate your gameobjects with, and you can then use these to casts rays on certain layers only, via Layer masks (a selection of layers). Note that layers and sorting layers are completely different things. There are no restrictions or naming conventions regarding sorting layers in the Corgi Engine.
Here’s a list of all the layers used by the engine. Note that the only mandatory ones are the platform related ones :
- Platforms : all your “regular” platforms should be in that layer
- OneWayPlatforms : for all your platforms that can be accessed from underneath
- MidHeightOneWayPlatforms : for one way platforms that you want to position at mid height compared to your character’s height. While walking, the character will ignore this platform and go through it.
- MovingPlatforms : for all your moving platforms
- MovingOneWayPlatforms : for all your moving platforms that can be accessed from underneath
- Stairs : for stairways
And these ones are pretty self-explanatory (and not mandatory at all, just used to tidy things up) :
- Water
- UI
- Player
- Projectiles
- Enemies
- NoCollision
- Invulnerable
Throughout its various classes, the engine makes use of layermasks. To initialize them, it uses a static LayerManager, that acts as an index of layers, complete with ready-to-use common layermasks presets (Player, Enemies, Platforms, etc). Don’t hesitate to also make use of it in your classes.
Tags
Tags are metadata you can add to your gameobjects to find them easier from other scripts. The engine used to rely on tags to find certain objects (player characters mostly). Since 3.0 it doesn’t rely on tags at all anymore. Feel free to keep using them in your scripts though, but that’s one less thing to keep an eye on.
Surface modifiers
If you want to affect the way characters interact with specific surfaces, you can use the SurfaceModifier class. This will let you define friction (normalized, close to 0 is very slippery, close to 1 is less slippery), as well as a force that will be applied to any CorgiController that gets grounded on that surface. For example, adding a x force will create a treadmill (negative value for a left going treadmill, positive value treadmill to the right). A positive y value will create a trampoline, etc. Note that this script will only work for a single character, not multiple ones.
Physics
The Corgi Engine is not based on Unity’s physics. That’s one of its strengths, but it also means that if your game relies heavily on physics interactions, especially for your character (pushing stuff, weight puzzles, torque…), this may not be the best solution. It comes with fallback compatibility, which will allow you to still work out common interactions (flat push, pull, etc) if you want. Look at the demos for some examples of push. That said, this only really affects the characters, and you can still use physics in the rest of your scenes for things like projectiles (the grenades in the Minimal demos are physics based), traps, etc.
Moving Platforms
Moving platforms will let you define a path for them to follow, as well as settings such as speed and delays, to determine how the platform will move on the path. You can also decide to have moving platforms moving using other scripts, or physics, or you could even move them manually in editor. You’ll find examples of all that in action in the MinimalMovingPlatforms demo scene, and generally across most demos. Note that moving platforms will only “carry” your character if it’s standing on them, they won’t push it laterally.
Note that moving platforms are designed to carry the characters that stand on it. If you’d like your platform to push the character horizontally too, you’ll want to parent a Pusher to it. You can see an example of this in action in the MinimalMovingPlatforms demo scene, look for the PushingMovingPlatform.
Pushing and pulling objects
The engine lets you create objects that will (optionally) react to gravity, be pushed around, or grabbed, transported and thrown by your characters. You’ll find different combinations of these demonstrated in the RetroPush demo scene.
To create the most simple pushable object, all you need is :
- a BoxCollider2D, isTrigger:false
- a Rigidbody2D, BodyType:Dynamic, Simulated:true In the RetroPush demo scene, that’s how the green block gets pushed around. In this case, Unity’s Physics2D will handle its behavior.
If instead you’d like the engine to handle it, you can have the following :
- a BoxCollider2D
- a Rigidbody2D, BodyType:Kinematic, Simulated:true
- a CorgiController
- a Pushable component
- a CharacterPushCorgiController ability on your character. This ability will let you define whether you’d like push to be button bound (it’s “3” by default in the demo), or automatic.
Lastly, you can add a GrabCarryAndThrowObject component, and this will let you grab the object and carry it, providing you have a CharacterGrabCarryAndThrow ability on your character. In the RetroPush demo scene, you can jump on the green block and press “E” on your keyboard to grab it, then “E” again to throw it.