Introduction
The Corgi Engine includes a lot of demo characters, and they all come with a number of animations. In the various demos, you’ll find some characters animated using spritesheets, some using Mecanim, Spine, or 3D fbx animated models. It’s really up to you to choose the animation method that fits your skills and needs. But the Engine should have you covered whatever method you decide on.
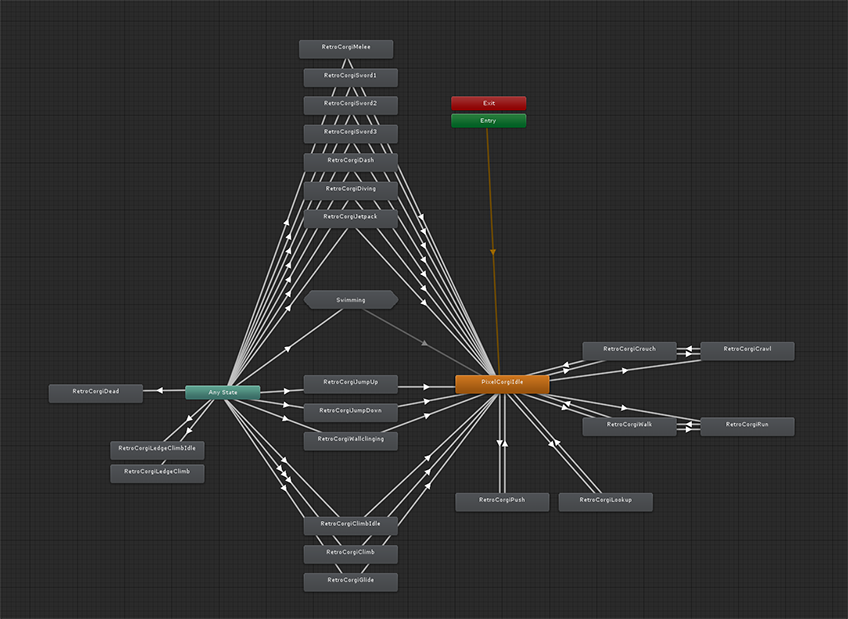
Also note that most character animators in the engine will use an “any state” pattern for demo purposes only. Of course you’ll probably want to use more traditional patterns for your own characters, like you would in any Unity project.
This page won’t cover how to create your animations. Unity has a lot of documentation on that, go check it out. It will however cover the specifics of the Corgi Engine and how it’ll help you create nice animated characters.
Animation Controllers
In most cases you’ll need an Animation Controller to setup your animations. The asset includes a bunch of these, with different setups and patterns, to showcase various use cases, and power the different demos. For your own characters, you’ll want to craft your own animator. You can look at the RetroCorgi animator for reference, but remember that it’s usually best to customize your animator to your own specific needs. You can use the CharacterAnimationParametersInitializer class to automatically create the animation parameters you’ll need.
You’ll notice some very simple characters in the demos, like the Rectangle character, use an “any state” pattern. That’s ok for quick and dirty results, but not something that’d be recommended if you want to retain full control of your characters’ animations, and control interruptions correctly. It’s best to avoid it for your own characters.
The Animation Controller is made of two big parts : on one side Animation Parameters that will get updated every frame by the Character and Character Abilities scripts to reflect the current state of the character, and on the other a state machine that will allow you to determine in which conditions each animation should be played and how to transition from one to the other. The Engine will feed and update animation parameters, the animator state machine itself is regular Unity, and will work like in any other project. If you’re not familiar with Unity’s animator, it’s highly recommended to learn how it works and how to setup transitions first.
There’s no limit to what you can do with the animation paramters updated by the engine. You can of course implement sub states and blend trees, or any other mecanim feature.
I’ve setup an animation and when I dash/attack/jump it doesn’t play
This is a very common question, Unity’s animator can be a bit tricky sometimes. What’s very likely happening is that another transition is interrupting the transition you expect to be active at that point in time. A first thing to check is to make sure the engine is doing its job correctly, and updating parameters as it should. To do that, you can select your animator at runtime, in check the animator’s parameters. Do they update as expected when you perform your action? If yes, then the engine is updating these values correctly, and there’s likely an issue with your transitions. If not, maybe you didn’t bind your animator to your Character component correctly. If paramters are updating correctly, look at what transition is playing instead of the one you’d expect. You’ll want to make sure no other transition than the one you’re after can play. This can be ensured by specifying enough conditions in your transitions, using sub states, or making sure your state machine paths are constrained enough.
Animation and scripts
The Corgi Engine’s character system has animation interfaces built-in to improve consistency and performance. Every ability comes already loaded with corresponding animation parameters. To update animation parameters, you can either use Unity’s built-in methods or the ones provided with the Corgi Engine. It’s really quite simple, as from any ability you only need to override two methods. Let’s have a look at how it’s used in the Dash ability :
First, usually towards the top of the ability class, we declare two variables for each animation parameter :
// animation parameters
protected const string _dashingAnimationParameterName = "Dashing";
protected int _dashingAnimationParameter;
The string has to be the exact same as the name of the animation parameter declared in Mecanim. The int will be used to store a hash of that string for faster use later.
InitializeAnimatorParameters : This method “registers” parameters, for later use. Basically it just adds that parameter to a list, after having checked its existence in the Animation Controller, to avoid potential errors at runtime. If that parameter doesn’t exist, update requests will simply do nothing, without triggering errors. This allows you to share a single animator amongst many characters, without having to copy all parameters into all the controllers. This method is only called at Initialization. It also takes care of hashing the string into an int for increased performance.
protected override void InitializeAnimatorParameters()
{
	RegisterAnimatorParameter(_dashingAnimationParameterName, AnimatorControllerParameterType.Bool, out _dashingAnimationParameter);
}
UpdateAnimator : This method, called every frame, will update the animator parameters with their current value. In it you should only have calls to MMAnimator.UpdateAnimatorBool/Int/Trigger.
public override void UpdateAnimator()
{
	MMAnimatorExtensions.UpdateAnimatorBool(_animator, _dashingAnimationParameter, (_movement.CurrentState == CharacterStates.MovementStates.Dashing), _character._animatorParameters);
}
If you wish to change your animator at runtime, you’ll have to make sure you refresh cached references to it, both at the Character level and the Abilities level. The animator gets cached by all these components for performance reasons.
Adding new animations
To add a new animation, all you have to do is create it, drag it into your character’s animation controller, and create a transition to it. If it requires new animation parameters, make sure you add them both to your animation controller’s parameters list and register/update them in your script(s) using the above methods.
Animation Parameters
Here’s a full list of all the animation parameters already in the engine. It is admittedly a long list. If you don’t want to add them all one by one, you can use the CharacterAnimationParametersInitializer component. Simply add it to your (parameter empty) animator, and press the button in its inspector. It’ll automatically add all these parameters, and nicely remove itself.
| Parameter Name | Ability | Type | Role |
|---|---|---|---|
| Activating | CharacterButtonActivation | Trigger | True when the character is currently activating something |
| Airborne | Character | Boolean | True if the character’s distance to the ground is above AirborneDistance (set in the Character component) |
| Alive | Character | Boolean | True if the character is currently alive |
| Carrying | CharacterGrabCarryAndThrow | Boolean | True if an object is being carried, false otherwise |
| CarryingID | CharacterGrabCarryAndThrow | Int | Set to whatever value is set on the carried object |
| CollidingAbove | Character | Boolean | True if the character is colliding with a wall above |
| CollidingBelow | Character | Boolean | True if the character is colliding with a wall below |
| CollidingLeft | Character | Boolean | True if the character is colliding with a wall on its left |
| CollidingRight | Character | Boolean | True if the character is colliding with a wall on its right |
| Crawling | CharacterCrouch | Boolean | True if the character is currently crawling |
| Crouching | CharacterCrouch | Boolean | True if the character is currently crouching |
| Damage | Health | Trigger | Triggered when the character takes damage |
| Dangling | CharacterDangling | Boolean | True if the character is currently dangling |
| Dashing | CharacterDashing | Boolean | True if the character is currently dashing |
| Death | Health | Trigger | Triggered when the character dies |
| Diving | CharacterDiveDive | Boolean | True if the character is currently diving |
| FacingRight | Character | Boolean | True if the character is currently facing right |
| FallDamage | CharacterFallDamage | Boolean | True the frame the character takes fall damage |
| Flip | Character | Trigger | True every time the character changes direction |
| Flying | CharacterFly | Boolean | True if the character is using its Flight ability |
| FlySpeed | CharacterFly | Float | The speed at which the character is flying |
| Gliding | CharacterGlide | Boolean | True if the character is gliding |
| Grabbing | CharacterGrabCarryAndThrow | Boolean | True when an object is grabbed |
| Grounded | Character | Boolean | True if the character is touching the ground |
| Gripping | CharacterGrip | Boolean | True if the character is currently gripping to something |
| Idle | Character | Boolean | True if the character is currently idle |
| Jetpacking | CharacterJetpack | Boolean | True if the character is currently jetpacking |
| Jumping | CharacterJump | Boolean | True if the character is currently jumping |
| DoubleJumping | CharacterJump | Boolean | True if the character is currently double jumping |
| HitTheGround | CharacterJump | Boolean | True if the character just hit the ground this frame |
| LadderClimbing | CharacterLadder | Boolean | True if the character is currently climbing a ladder |
| LadderClimbingSpeedX | CharacterLadder | Float | The horizontal speed of the character if he’s on a ladder |
| LadderClimbingSpeedY | CharacterLadder | Float | The vertical speed of the character if he’s on a ladder |
| LedgeHanging | CharacterLedgeHang | Boolean | True if the character is currently hanging from a ledge |
| LedgeClimbing | CharacterLedgeHang | Boolean | True if the character is currently climbing up a ledge |
| LookingUp | Character | Boolean | True if the character is currently looking up |
| NumberOfJumpsLeft | CharacterJump | Int | The amount of jumps remaining this frame |
| Pulling | CharacterPushCorgiController | Boolean | True if the character is currently pulling |
| Pushing | CharacterPushCorgiController | Boolean | True if the character is currently pushing |
| Random | Character | Float | A random float between 0 and 1, updated every frame, useful to add variance to your state entry transitions for example |
| RandomConstant | Character | Int | a random int (between 0 and 1000), generated at Start and that’ll remain constant for the entire lifetime of this animator, useful to have different characters of the same type |
| Running | CharacterRun | Boolean | True if the character is currently running |
| Rolling | CharacterRoll | Boolean | True if the character is currently rolling |
| Speed | CharacterHorizontalMovement | Float | The current horizontal speed of the character |
| xSpeed | Character | Float | The current horizontal speed of the character |
| ySpeed | Character | Float | The current vertical speed of the character |
| xSpeedAbsolute | Character | Float | The current absolute (always positive) horizontal speed of the character |
| ySpeedAbsolute | Character | Float | The current absolute (always positive) vertical speed of the character |
| StartedRolling | CharacterRoll | Trigger | True when the character starts rolling |
| Stunned | CharacterStun | Boolean | True while the character is stunned |
| Swimming | CharacterSwim | Boolean | True if the character is swimming and moving |
| SwimmingIdle | CharacterSwim | Boolean | True if the character is swimming and not moving |
| Throwing | CharacterGrabCarryAndThrow | Boolean | True when an object gets thrown |
| Walking | CharacterHorizontalMovement | Boolean | True if the character is currently walking |
| WallClinging | CharacterWallClinging | Boolean | True if the character is currently clinging to a wall |
| WallJumping | CharacterWallJump | Boolean | True if the character is currently jumping from a wall |
| WorldXSpeed | Character | Float | The x speed at which the character moves in the world (will be 0 if stuck) |
| WorldYSpeed | Character | Float | The y speed at which the character moves in the world (will be 0 if stuck) |
Weapon Animation parameters
In addition to all these, you’ll find more animation parameters on Weapons. While ability animation parameter names are usually arbitrarily defined by the engine, weapon animation parameter names are up to you. The reason for that is that a Dash, for example, is a unique ability, while your Character could very well be wielding many weapons, and you’ll maybe want to be able to trigger unique animations for each.
On each weapon you’ll be able to define the following animation parameter names. All of them are optional, so it’s really up to you to decide the ones you need (SingleUse is the most commonly used, it’s triggered when the weapon gets used). Note that these parameters are all triggered by CharacterHandleWeapon, and will be passed to your Character, but also any other Animator that you’ll have linked on the Weapon itself. So you could have a sword that, when used, triggers animations on the character, and turns itself into flames (why not).
| Parameter property | Ability | Type | Role |
|---|---|---|---|
| WeaponAngleAnimationParameter | CharacterHandleWeapon | Float | The current angle of the weapon (based on WeaponAim) |
| WeaponAngleRelativeAnimationParameter | CharacterHandleWeapon | Float | The current angle of the weapon, relative to the Character’s facing direction (based on WeaponAim) |
| IdleAnimationParameter | CharacterHandleWeapon | Boolean | True if the Weapon is idle |
| StartAnimationParameter | CharacterHandleWeapon | Boolean | True if the Weapon is getting started |
| DelayBeforeUseAnimationParameter | CharacterHandleWeapon | Boolean | True if the weapon is in its DelayBeforeUse state |
| DelayBetweenUsesAnimationParameter | CharacterHandleWeapon | Boolean | True if in between two uses |
| StopAnimationParameter | CharacterHandleWeapon | Boolean | True when the weapon gets stopped |
| ReloadStartAnimationParameter | CharacterHandleWeapon | Boolean | True when reloading starts |
| ReloadStopAnimationParameter | CharacterHandleWeapon | Boolean | True when reloading is complete |
| ReloadAnimationParameter | CharacterHandleWeapon | Boolean | True while the weapon gets reloaded |
| SingleUseAnimationParameter | CharacterHandleWeapon | Boolean | True at the exact frame the weapon is used (a bullet gets shot, a sword hits, etc) |
| UseAnimationParameter | CharacterHandleWeapon | Boolean | True while the weapon is actively used |
| EquippedAnimationParameter | CharacterHandleWeapon | Boolean | True when the weapon gets equipped |
| ComboInProgress | CharacterHandleWeapon | Boolean | True if a combo weapon is being used |
Spine
If you want to use Spine, there are two ways you can go :
You can “bake” your character via the Spine Unity runtime. All the demo playable characters included in the asset use this method, but I wouldn’t recommend it for your game. The demo characters are baked because that was the only way to include them without having to add the Spine runtimes. These can’t be distributed by anyone else but Spine, so that was not possible. But baking Spine characters prevents you from using all the cool Spine features.
The “best” way to do is to create/animate your character in Spine, then do File > Export, select .json extension and format, check “create atlas”, go to parameters, set the atlas extension to .atlas.txt, tweak the other settings according to your character, and then export to a folder inside your project. This will create a bunch of Spine related files. You’ll then want to select the SkeletonData file, and drag it into a scene. Select the SkeletonMecanim option (SkeletonAnimator in older versions of the Spine runtime), and you should see your character on the scene. If that’s not the case, you probably need to select a skin from that new object’s inspector. While you’re at it, select the sorting layer of your choice (Player is the recommended one). You can now drag that object into your hierarchy to create a prefab.
Now there are two things left to do : add your Character’s components (see this page for more), and take care of the animator. Spine animators work exactly like regular ones. Select your Character, and go to Window > Animator. There you should see an empty state machine. Start by adding the animation parameters you’ll need from the list above (Idle, Crawling, Crouching, etc…). Then, from the folder with all the exported Spine files, unfold the Controller animator, and drag and drop the required animations into your Animator. The only thing left to do is to create transitions to all these states, and that’s done exactly like for regular animation controllers (see higher in this page).
Two more things : you should nest your Spine object under the top level of your character (which should be an empty gameobject with just the colliders, CorgiController, Character and CharacterAbilities…). You can look at the NativeSpineCorgi example character for reference, located in Demos/Corgi2D/Spine/NativeSpineCorgi.
Debugging animations
If your animations don’t trigger, or if they don’t trigger when you want them to, it can get a bit confusing to figure out what the issue is, especially if you’re new to Unity’s animator. The first thing you should do if that’s the case is probably to read Unity’s resources on Mecanim, such as this one.
Once you’ve got a better understanding of the basics, here are a few ways you can pinpoint the issue :
Your character doesn’t animate at all It’s likely that you didn’t bind your animator to your Character, and so the classes and abilities that handle the logic of your character don’t know what animator to update. Select your Character, open its Character inspector, and make sure you dragged your Animator object into the CharacterAnimator slot.
Your character does animate, but things don’t happen when you want to All the engine does is send and update animation parameters. If these do update, the engine is doing its job correctly. You can double check that by pressing play, selecting your character’s animator at runtime, and perform an action (like jump). If the jump parameter turns to true on time (sometimes for a while, sometimes only one frame depending on the parameter), all is fine on the engine’s side. That parameter change is usually instant, as soon as you perform the action, with only a few exceptions.
What’s left to do if all is good on the engine’s and logic side is tweak your animator’s transitions. This can be done like in any Unity project, there’s nothing specific to the engine here. Common offenders will be exit time (both the duration and the associated checkbox, transition duration, interruption sources, etc), but unfortunately there are no universal rules, and each animator requires its own approach based on your context and setup. Setting up transitions can be quite complex, and some may not find it very intuitive. Unity’s got some documentation on it that you may want to check.