Introduction
Whatever version of Unity you’re using, remember to always import the asset in an empty project, so that the engine’s project settings get properly imported. If you decide not to import in a blank project, at least make sure to remove the old Corgi Engine folder first to avoid conflicts.
How to import the Corgi Engine in your project?
- Create a new empty project using 2D or 3D as the Template
- Go to Window > Package Manager, then from the top left dropdown pick “My Assets”, find Corgi Engine in the list and import it the project (it has to be in an empty project, not an existing one)
- You will be warned that importing the Corgi Engine will overwrite your current project settings (that’s normal), click on Import.
- This will take a bit of time.
- Once this is complete, you’ll get a prompt saying “This Unity Package has Package Manager dependencies”. This is also normal, click on “Install/Upgrade”.
- After that you’ll get a list of the contents of the engine, don’t touch anything, and click on Import in the bottom right corner.
- Import will also take a while. Once import is complete, you’re ready to use the engine. Have fun!
How to import the Corgi Engine in a URP project?
The engine doesn’t do any rendering, it’ll work with any render pipeline.
The demos are made using the Standard Render Pipeline, as it’s the most common denominator, but you can use any RP you prefer. Here are steps to install the project in a URP context:
- Create a new empty project using 2D or 3D as the Template
- Go to Window > Package Manager, then from the top left dropdown pick “My Assets”, find Corgi Engine in the list and import it the project (it has to be in an empty project, not an existing one)
- You will be warned that importing the Corgi Engine will overwrite your current project settings (that’s normal), click on Import.
- This will take a bit of time.
- Once this is complete, you’ll get a prompt saying “This Unity Package has Package Manager dependencies”. This is also normal, click on “Install/Upgrade”.
- After that you’ll get a list of the contents of the engine, don’t touch anything, and click on Import in the bottom right corner.
- Import will also take a while. Once import is complete, go to the Demos folder, and double click on the CorgiEngineDemosURP unitypackage, and import it.
Older versions of the engine (before Unity 2019.2 only)

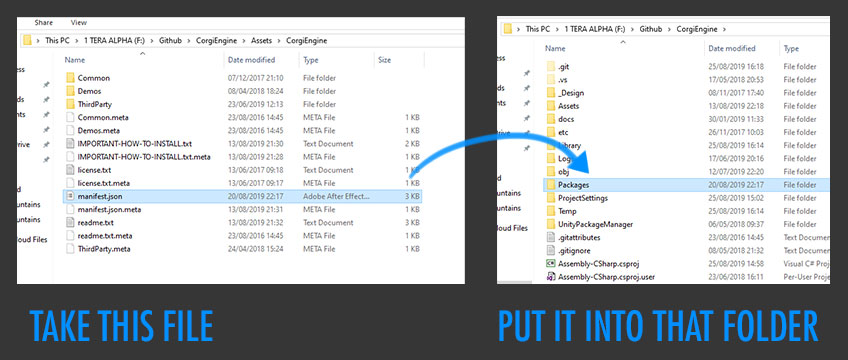
On install you’ll likely get a number of errors, that’s absolutely normal. All you need to do to fix them is, from your file explorer (not from Unity) copy the manifest.json file, located at the root of the Corgi Engine folder, and paste it into your project’s Packages folder, replacing the one that is already there. You may have to restart Unity and/or reimport your packages folder, but most of the time it just works out of the box.
While replacing the manifest is the easiest and fastest way to go about getting the asset to work, this may cause some issues if you want finer control over what packages your project uses, such as LWRP or HDRP. In that case, it’s recommended to install all the asset’s dependencies manually. There are only 3 packages needed for the asset to work : Cinemachine, 2D Pixel Perfect, and the PostProcessing stack.
If you prefer manually installing packages, don’t override the manifest.json, but instead open it. It contains the exact version numbers you need to install for these 3 dependencies. Then go to Window > Package Manager, and install the exact same versions of Cinemachine, 2D Pixel Perfect and PostProcessing as specified in the manifest. Some of these may not be compatible with a brand new release of Unity, in which case you should probably either pick a more recent version of the package, or safely wait until the next Corgi Engine update.
A bit of info about why this may happen : Unity allows (for now) an asset on the Asset Store to upload its Project Settings folder (which includes input, quality, etc), but not the Packages’ manifest.json, which describes what packages the asset uses (such as, in this case, PostProcessing and Cinemachine). Hopefully that will change in the near future. In the meantime, please try the steps above if you run into issues.
Tilemaps and 2D Extras
The engine uses tilemaps in some of its demos (the Retro ones, mostly). If you wish to use or edit these tilemaps, you will need to add Unity’s 2D extras to your project, as most of the tiles in these demos’ tile palettes rely on them. To add the 2D extras to your project, simply download the latest release’s source as a zip, and extract its contents into your project in the folder of your choice. These used to be included in the asset, but Unity now has separate versions for different editor versions, and it’s still not available via the package manager, so this manual installation is unavoidable.
Unity versions not yet supported by the engine
Updates for the Corgi Engine usually support the latest stable version of Unity, but sometimes they lag behind a bit. If you’re importing the asset in a freshly released Unity version, chances are some packages won’t be compatible and you’ll have to manually sort dependencies using the method described above.